Free Download
The Shellac Handbook

")
")
Free Download
The Shellac Handbook
Video Podcast Transcript:
Welcome to the Art Of Lutherie Podcast, My name is Tom Bills and Today I have a really cool technique that is actually critical to my process for finishing my guitars. I’ll be showing it to you and explaining how to do it right here is this podcast.
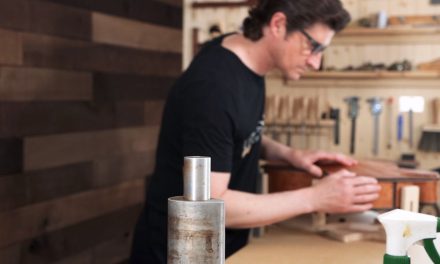
This morning I was working on this guitar, applying a French polish finish and I am currently transitioning from the pore filling stage to the bodying stage. For many people this can be a very tricky point in the process. If you don’t make the transition right you can make it a lot harder for yourself throughout the rest of the process, but if you do it right, then you can set yourself up for a really beautiful finish and much more pleasant process.
What Is French Polishing?
I will be jumping in and telling you more about the technique and demonstrating it for you in just a second, but before I do, I thought it might be important to explain briefly what French polishing is in case anyone watching doesn’t know. French polishing is a traditional method of finishing a guitar with a pad using all natural materials such as alcohol shellac resin, olive oil is very common, walnut oil. To me it is a beautiful process, I kind of feel like French polishing saved my life in some ways. In the past, I really struggled with the toxicity of the synthetic finishes such as Nitrocellulose. In the process of using those toxic chemicals, I accidentally lit my house on fire and even ended up in the hospital from it as well. So French polish came into my life and it did take some work to master it and get it down, but man, has it been worth it! Not only do I have a healthier life, healthier for me and my family, but it also made my guitars sound better too! So what’s not to love about that!
If you are interested in learning more about French polishing, I have a free three-part series over on my website called the Introduction To French Polishing. If you want to go even deeper than that I have a full video course where you can learn my entire French polishing process from start to finish which is called The Art Of French Polishing.
Enough about all that, let’s jump over here and I will show you my technique for keeping the purflings clean and free of color when working with highly resinous woods like this cocobolo right here.
Transitioning From Pore Filling To Bodying
I have just completed the pore filling on this guitar, I used the traditional pumice pore filling technique which is my preferred method. It uses mostly alcohol and pumice with a little bit of shellac thrown in just to keep the white pumice clear. I am now moving into the transition from the pore filling to the bodying stage of the building of the shellac on the surface.
There are many different approaches to making this transition, some people will sand the guitar after the pore filling which to me is a tragedy because if you do the pore filling right it will create a smooth and beautiful satin and completely filled surface like this. When doing this I did not do any sanding. After the pores were filled I just went over the surface with my cheese cloth and alcohol and keep moving to a different place on my cheesecloth to remove any excess pumice that was built on the surface during the process.
A key is to work wet enough dissolve and remove the excess finish while at the same time depositing the slurry it creates into any unfilled pores – leaving behind a clean, satin, pore filled surface.
In this case I used cocobolo which has tons of color that wants to come out all over the place when the alcohol hits it. If you are not careful it can leave visible chunks and bumps and strong color all over during the pumice porefilling. But instead of making a big mess and then sanding all that off when I am done, I can actually just remove it with alcohol as I go. What is so cool about that is that I can actually take whatever was left on the surface and deposit it into any open pores and then just clean the rest off. What you end up with is this really gorgeous filled surface.
I cover every step of that whole technique in depth in my online video course The Art Of French Polishing, which is part of the Luthier’s EDGE course library and is included for free for all members. I am not going to get into those steps here. The specific thing that is a nice little trick and really … a critical, and very important trick when working with very resinous wood like this cocobolo (or even many rosewoods) is how to deal with a situation where you have a resinous wood with lots of color-bleed and you also have light colored wood purfling lines such as these maple lines I have here.
I am going to show you a simple technique I use to keep my maple purfling lines looking clean without sanding and without anything fancy, just a simple trick to make the lines look great and get the pores filled at the same time.
How To Clean Purfling Lines
The first and most important step to start with before I begin the pore filling process at all is the sealing when I am preparing the wood. I carefully seal the purfling and anything else light colored that I want to protect with a few good coats of shellac (at least 2 – or even more for cocobolo). This helps them to resist the color from actually staining into the light colored wood…again, all these steps are covered in depth in The Art Of French Polishing Course, but today what I will be showing you is the technique for cleaning the purfling lines after I am done with the pore filling.
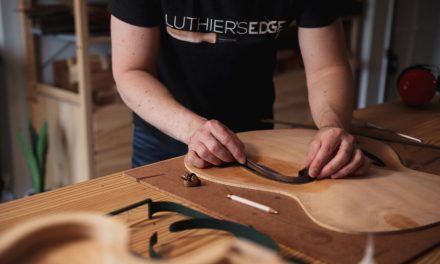
Where I am now in the process for this guitar is I have already cleaned the purfling on the back of the guitar, and I have cleaned this line here down this side, but I have not cleaned this side yet. As you can see the purfling on this side is very yellow and does not look like maple. It’s not ugly by any means, and it is OK to leave some color on there if you want to. I like some color to keep the guitar unified and actually, when I went through and cleaned these areas, I left a bit of color here on the sapwood areas where it meets the dark cocobolo. I sort of fade the color in to reduce the harshness of the contrast between the dark and light. You can think of it like an artist working with oil paints, you can go back and rework color, smear it, remove it, blend it…whatever you feel will get the look you have in mind. So as I cleaned these areas after pore filling, I left a little bit of the darker cocobolo tones in there because I felt it tied things together visually and it happens to be very close to the color of my mahogany neck as well. When finishing I am always looking for ways to build visual cohesiveness and unity into the guitar as a whole by using the color of the finish.
Demonstrating The Technique
Here you can see that I have repositioned the guitar and there are a couple of things you might notice. When I went back and cleaned the surface off from the last parts of the pore filling process, and also when I cleaned the purfling lines on this side, it all looks very smooth with a satin texture. On this side though, you can see a shine because of the way I worked with my cheesecloth when finishing up the pore filling. So there is some extra finish material built up on the surface there. It feels very smooth when I touch it and can be deceiving. I think a lot of people leave this on the guitar without knowing it which in many cases is just fine, but in this case the cocobolo has so much color that it is very important to be conscious of where you are leaving color and where you are not.
You can see that this is a little bit shiny because I haven’t cleaned it yet. I also can’t tell if the camera is picking up the color properly or not, but the part which has not been cleaned is very yellow and kind of dirty looking. In real life, what I am seeing here is that on this side and especially up in this area here it looks very yellow and dirty. The thing I really want to capture on video for you is the actual technique because just talking about it doesn’t really make it clear and I think when you see how easy it is you’ll be like “hey I can do that!”.
Basically, what I am doing is taking a paper towel and tearing it in half a few times until I get down to the size close to what I want. Then I fold it over a few times to give it some thickness..this is just a Bounty paper towel.
Next, I take my bottle of alcohol (I use Everclear) and put a dash on the paper towel. This is very simple. I’m going to just come in and start working a little at a time and as I do you will see how much color starts coming off the surface.
The secret is not to overwork it. This seems like it wouldn’t make sense because you just spent time filling the pores with pumice and logically if you rub it with more alcohol you’ll tear it out. But the reason why you can get away with this without removing the pore filling is because there is a small window of time before the effects of the alcohol can get down into the pore fill material and soften it. So you can work the material on the surface, dissolving, redistributing it, and remove it before it has a chance to affect the material in the pores.
Now keep in mind I use Everclear, if you use something more chemically hot (higher proof) that window might change a little, so do some experimenting to see how it will work for you and adjust your technique accordingly.
So let me show you, as you can see I have a small window of time where I can dissolve what is on the surface and then I can move on before it has a chance to mess up the material in the pores. What is really cool, and one of my favorite aspects of this, is that in the process of doing this I can simultaneously push that extra material from the surface down into any pores that were left open or were a little low. You have to play with your technique and movements etc to get it right, but when you do it’s a great way to get those stubborn pores filled around the binding while cleaning the purfling at the same time.
I use a flexible bench light to keep a glare on the surface so I can closely inspect my progress. I keep adjusting the technique and the alcohol etc. as needed to get things flowing just right. It is important to watch and be sure you are not undoing the pore filling you already did.
By the way, the pore filling process is the most important part of the French polishing that you do. If you do a great job on the pore filling and take time on these details, your finish will be amazing and you won’t have to waste time wrestling with pores after there is finish built on the surface. There are ways to deal with that, but it is much easier to get all that stuff taken care of at this stage which gives you a great advantage.
Another great thing is that after doing this technique you might start to understand on a more intuitive level how this all really works. When pore filling you work wet (more alcohol) in order to remove finish from the surface and deposit it in the pores. When you want to build finish, you work dry (less alcohol) which will build finish faster on the surface. So working wet strips the finish off the surface and working more dry will build finish on the surface….once you “GET” that in a deeper and intuitive way it will open up this whole process to you and you’ll make some big strides in the quality of your French Polishing.
I just did this area while I was talking and I hope you can see that it is a lot cleaner looking now. This paper towel is dirty so I can just grab another piece like this, add some alcohol and continue around.
The point I am trying to get to, but keep going off on tangents is that once you do get this intuitively, you might say, “hey you know what? I have a problem with a pore over here by the neck” or something like that, and you’ll know how to deal with it right away.
Bonus Pore Filling Tip
You can see I have a piece of masking tape here and of course before I put it on the guitar I stuck it to my t-shirt and jeans to get it nice and linty in order to reduce the tack so it won’t damage anything when I remove it. The tape is there to protect the neck from getting the cocobolo color on it during the process. Then what I can do is take my little paper towel and I can go in remove any issues that might be there in that area where the neck heel meets the body. Let’s say there was a ridge of pumice left on the surface, I could go in and dissolve that and at the same time work that slurry of pumice and shellac and alcohol down into any open pores and at the same time remove the excess. What will be left is a satin smooth surface with the pores filled and ready to go to the next steps. Now remember, you don’t want to overwork it and dissolve the material down in the pores, so be conscientious and play around with your technique a bit to find what works.
When you take time to address issues like that at the pore filling stage it will make your French polishing so much easier. Once I am done with this technique and I have everything cleaned and filled the way I want it, I will re-seal everything again. Then I’m ready to move on to the body sessions and start building finish on the surface which is all clean and beautiful and required no sanding using all natural non-toxic pumice, alcohol, and shellac.
So I hope you found that useful, I know for me that technique really comes in handy. As I was working on that guitar this morning I thought to myself..man I am so glad I know that technique otherwise what would I do. That’s when I realized I should turn the camera on and share it with you. So I am hoping this will be very helpful and useful for you to help you build better guitars.


Very nice stuff, thank you.