
Today, I’m going to share 3 tips you can use to upgrade the quality of your guitar binding work AND your enjoyment of the process.
When I first started building guitars, the experience of gluing the binding onto the guitar body was filled with:
- Dread
- Stress
- Drama
Thankfully, over the years, I discovered three essential techniques that transformed my entire binding process into something that:
- I look forward to
- Has way less stress
- Produces better quality results
Now, I can enjoy the process because I know it will go smoothly and turn out great every time.
I’m excited to share these tips to help you improve the quality of your binding work and enjoy it a little more, too.
You’ll find a condensed version of each step below for quick reference and clarity.
I also made a video version that goes into more detail about each step and how to do it here:
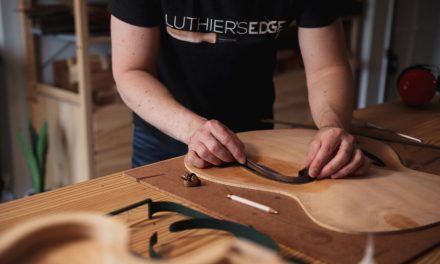
Tip 1 – Fit Your Guitar Binding Perfectly
At its core, this first technique is about being more intentional and strategic about how we spend our efforts and time.
When I was new to guitar making, I didn’t take the extra time to ensure my binding fit perfectly into the binding channels. I assumed (incorrectly) that I could muscle it the rest of the may with binding tape. The result of this approach was binding with gaps, a ton of stress, and bloody and bruised knuckles (more on that later).

Eventually, I woke up and realized that I could get way better results by just taking some extra time to fine-tune the fit of the binding (and purfling).
That simple shift in approach makes the installation easier, produces higher-quality results, and helps prevent future problems. (Since the guitar binding will be at rest in the binding channel and not be fighting the glue 24-7-365 forever trying to pop loose.)
To put it in the simplest terms, we have two options:
- Install the binding immediately, then spend hours trying to deal with problems and hide mistakes.
- Take the time upfront to get it right, then install the binding with little to no problems to deal with afterward.
I don’t know about you, but I’m going with option 2!
For a more in-depth explanation: Watch The Video Version Here
2 – Seal The Whole Guitar Before Binding
The core concept behind this next tip is to protect the guitar during the process and to give the tape a better surface to adhere to.

Before I start the binding installation process, I seal the entire guitar body with a 1-pound cut of shellac which provides a variety of benefits, such as:
- It acts as a preview of the finished instrument, which allows me to inspect the guitar surfaces for deep sanding scratches, glue drips, and other details that could be problematic later on in the process but that are easy to fix at this stage.
- It protects the wood from being stained or even ruined by excess glue, glue drips, or runs. This is especially important if you use CA glue for the installation, like I do.
- If using CA glue for installing the binding, it is critical that you also seal the binding channels to prevent the CA glue from wicking into the woods and causing irreversible damage, especially with spruce, cedar, or light-colored hardwoods such as maple.
- It also provides a better surface for the binding tape to adhere to and helps to prevent grain tear-out when removing the tape when the glue has dried. (You still have to remove the tape using the proper technique, but the shellac sealer coat has helped reduce the chances and instances of tear-out for me.
NOTE: If you’re using water-based glues such as Tightbond or hide glue, you should NOT seal the binding channels because those glues need to get into the wood to have a strong joint.
For a more in-depth explanation, Watch The Video Version Here

Tip 3 – Use The Right Tape (& Tape Dispenser)
Initially, I used only the brown binding tape from luthier suppliers. It’s a good tape, but if I pulled too hard on it, it would tear, and when it did, I would often slam my hand down on the edge of the workbench, bruising and cutting my knuckles. When I was done, my hands looked like I was just in a fistfight.
Fortunately, when I changed to using CA (Superglue) to install my bindings, I had to find a new type of tape. The brown paper binding tape soaks up thin CA glue and can make a big mess with all that tape glued to your guitar…not good.
I experimented with all types of tapes to find the best fit and eventually found what, for me, is the perfect binding tape: fiberglass strapping tape.
*Also see my Ultimate Luthier’s Guide To Tape for more on this subject.

This tape solves the CA problems, and its fantastic strength eliminates any tearing or breaking, no matter how hard I pull on it.
Another great thing about it is that it’s easy to get and can be found at any hardware store. It contains fiberglass threads to prevent breaking, and the backing is plastic, which CA glue can’t stick to.
That extra strength does make it hard to cut, though—that’s where the importance of having a good tape dispenser comes in.

I used various types over the years, but the Stewmac Tape Deck is by far the best I’ve found. I have used it for all my tapes for the last several years. It’s still razor-sharp and makes the binding process so much faster.
Keeping The Passion
My hope is that these three things I just shared will help you improve your guitars and improve your time in the workshop.
Remember, we chose this craft because it’s our passion and because we love it. I still enjoy it after 25+ years, but that didn’t happen automatically.
It takes effort to keep it fresh. These tips I shared with you are only one example of how you can continue to refine your approach, searching for that sweet spot where the quality of your experience increases, too.
And when you do that, the quality of your work really does take a quantum leap as well, because your heart’s fully in it.


