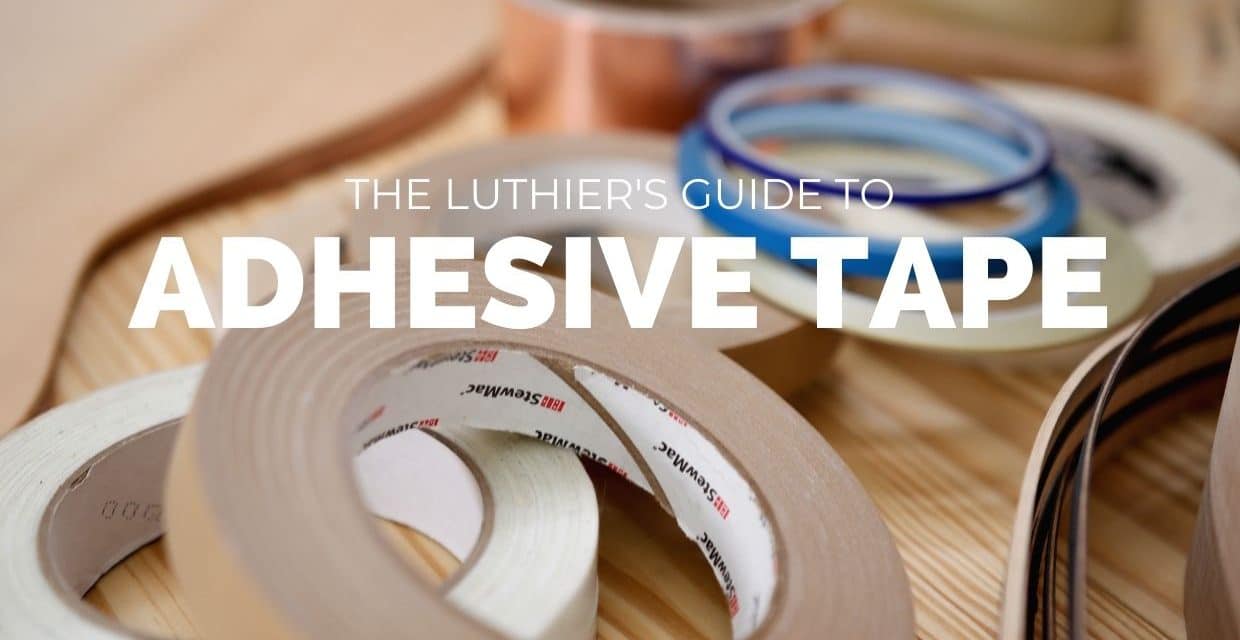
Right… but it gets more interesting when we start striving to increase the quality and efficiency of our guitar-making work. When you start to look deeper, or simply just when you begin to get a little more experience under your belt (and make a few mistakes to learn from), it becomes apparent that matching the right tape with the right lutherie task is critical to putting us in an advantageous position, not to mention helping us do our best work.
That led me to the ubiquitous brown tape sold by many luthier supply companies, which was good until I began to use super glue to install my bindings. Making that change led to a whole new exploration and understanding of tapes.
Not long into my career, I learned a very hard lesson about adhesive strength and how too much can be bad for finishes and wood grain in softwoods. Thankfully, through it all, I found some great solutions for this issue, too. It’s been about 20 years of trial and error, experimenting, and making some pretty decent mistakes. Eventually, I found a few helpful solutions to get some great results with my guitar-building work.
My hope is that this guide to luthiers tape will help you avoid some of the trial and error I went through and get the right tape for the job at hand so you can stay focused on what really matters — finishing your guitar-building project with excellence and enjoying the process.

Tape For Guitar Fretwork
When it comes to guitar fretwork such as fret leveling, fret crowning, fret polishing, or even fret-end beveling, the tape I use most is basic masking tape to cover the fingerboard and protect it while I do my work.
You can see my exact process in my online luthier courses: Fretwork Mastery 1 & Fretwork Mastery 2. Those courses and many other are part of the Luthier’s EDGE online guitar makign school.
I have found that the biggest danger is tape adhesive that’s too strong. It can damage the inlays or even the finish of the guitar whether by its strength, or the chemical reaction that the strong adhesive may have with the materials or finishes.

1. The Lint Trick – Make your tape “low tack” by simply sticking it to your T-shirt or jeans and then peeling it off. This simple trick adds just a bit of lint form your clothing to reduce the tack and help protect your delicate finishes and inlays.
2. Make Handles – Take a piece of tape slightly longer than you need and fold the two ends back on themselves to make handles for easy removal and help in preventing finish damage from fingernails.
3. One last tip – When I need thinner tape, I just stick it to a smooth piece of wood or Masonite. Then I cut it in half just by eye using my X-Acto knife or #11 scalpel. Then, when I peel it, it will have less tack and be ready to use on my fingerboard.


Binding Tape for Luthiers

1 – Tape for guitar binding with Tightbond Glue
One thing I learned the hard way: This tape will tear under pressure if the edge of your binding is too sharp, or you pull too hard. If it happens while you are pushing down hard then you might slam your knuckles on the edge of your workbench – ouch!
Other than that, the brown binding tape is great. Just ease those edges a little if it starts tearing on you.
When removing the tape, pull it off gently and slowly on a low angle to help prevent tearing out wood from the soft grains of the guitar top. This applies any tape used for binding that gets stuck to spruce or other soft woods.

2 – Tape for guitar binding with CA glue
I tried many types of tape over the years, but strapping tape is my absolute favorite. It not only helps with the CA glue issue but has the right strength and tack for getting great pressure on those stubborn wood bindings.
What I like to do is get a regular cheap role of this stuff and put it into a tape dispenser. I like the cheaper kind with fewer filaments because it still has a tiny bit of stretch that seems to help me get the amount of clamping pressure exactly right.
Because of the filament design of this tape, I can easily split it into more narrow widths by simply starting the cut in the middle of the role and then pulling one side at a time. This tape gets into tight places more effectively, and you have two roles of tape for the price of one!
Still, most types still have plenty of adhesive tack to rip out wood fibers when you remove it. Be sure to follow the recommendation I mention above in the brown paper tape section when removing any tape — go slow, be gentle, and use a low angle as you pull.

Double Stick Tape for Guitar Jigs & Duplicating
Double-sides masking tape is perfect for many guitar-making tasks, especially jigs and duplicating. Other double-stick tapes have little or no backing. This tape has a perfect backing. It has a super strong adhesive and isn’t overly expensive.

I used to order from Anchor but it was harder to get and I had to buy a lot at once or go in with a friend. My new favorite I have been using for years now which works great is from Uline: Uline Double stick masking tape.
I also noticed that they sell what looks very similar on Amazon now as well, but I haven’t tested it. If it works it might be a very convenient option, you can check it out here.
These techniques are key to making this tape work:
- Don’t use too much – It’s super strong — a little goes a long way. If you overdo it, you can have a tough time getting your parts separated after you’re done. After a little time working with this, you will get a feel for how much is just right for each template you use with this tape.
- Don’t fight the adhesive. Dissolve it – This one is the big key right here. I like to use Ronsonal (partly just for the handy bottle), but any naphtha will do. Just pour some down between the part and the template and it will cause the tape to let go almost instantly.
- Let the tape dry after removal – Once you have your parts separated, let the remaining Naphtha dry. The tape will then come off cleanly. If you don’t let it dry, it will feel slimy and be harder to get off and clean up.

Tape for Guitar Finishing
Currently, I finish my guitars using a French Polish of shellac and oil. I can get away with just using simple masking tape for most things and occasionally some stripers tape. However, years ago I sprayed all types of different synthetic finishes from Nitrocellulose lacquer to water based. I am happy to say that this stripers tape works well for many different applications, but if you are using masking tape, do some tests to make sure that it will be able to stand up to the solvents in your finish on some scrap wood first.
There are many types of fine line stripers tape available. Based on my experience, it pays off in the long run to get the 3M brand Striping tape in the sizes you need, even though it can be more expensive. The cheaper ones always seem to move, or the solvents in the finishes will melt them. Again, this will vary on what finish you use. Keep it in mind while testing and refining your workflow, along with the products you use in your system.

Always make sure the adhesive you use is compatible with your finish before applying it.
Always.
Years ago, I had just finished buffing one of my very early archtop guitars. It had a beautiful Nitro finish — maybe my best up until that point.
I just completed the fret work and started the final bridge fitting process. It was time for lunch, though. Without thinking, I put some masking tape on the top where the bridge location was so I wouldn’t have to relocate it after lunch.
When I got back, I removed the tape to discover to my horror that the adhesive reacted with that fresh Nitrocellulose lacquer and melted down into it. I had to sand and buff it out and all was okay. But it was traumatizing!
I never forgot this lesson. Always double-check before putting tape on a guitar finish of any kind.
Shielding Tape for Guitar Electronics

You can also line your solid-body guitar cavities with this type of shielding tape. It has many other uses like using it as a flat ground wire and much more.
Tape Dispensers (The Tape Deck)
I decided to give it a try and to my pleasant surprise it was just awesome! Solid metal, super stable, and just all around a great tool. I’ll be getting more “Tape Decks” soon for my other tapes and adhesive sandpaper rolls very soon.
You can see my old one I’ve been using for over 20 years and also the new one in the photo below.


CLICK HERE To Download Your Luthier’s Guide To Tape PDF Summary
[/et_bloom_locked]
Final Thoughts & Your Favorite Tapes
I hope this list should give you a great start in finding just the right tape for the job on your next guitar building project as well a a few tips that have been helpful to me (many of which I learned the hard way).


I enjoyed the topic of Luthiers guide to tape.
I have 6 of the Stew-Mac tape dispensers and they are great. They are heavy so they don’t move when pulling tape. One note of caution! early on I reached for some tape and it was not under the yellow plastic guard that keeps the tape down as it is pulled .I pulled downward and raked the end of my pinky (5th )finger across the serrated blade that cuts the tape . Not only did it Hurt like crazy , it left an abrasion that looked like a recently plowed row garden. It took an amazing length of time to heal completely. I was careful to use gloves until it did heal and won’t make that sloppy and painful error again.