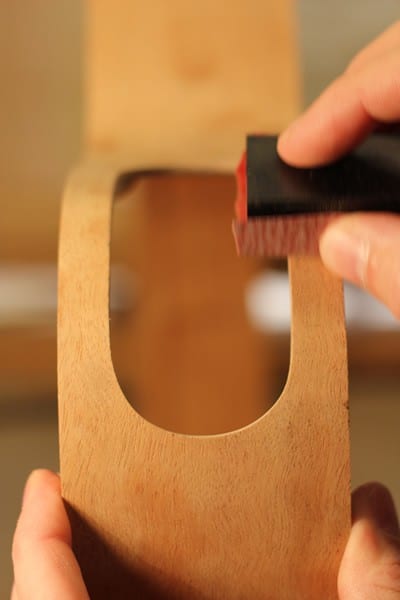
 One of the things I absolutely love on virtually any guitar is a side sound port. In my opinion it improves the quality of the guitar’s voice for both the player and the listeners.
I think the first side sound port guitars I saw were in the Scott Chinery Blue Guitar Collection in a book called: Blue Guitar. I was intrigued and inspired and as always I had to try it.
Learn about the benefits of guitar side sound ports and how to make one on your next guitar in the 52 page eBook & Tutorial – click the eBook image to the right to learn more.
Learning About Ports From Bill Porter

Bill Porter Recording Engineer
While majoring in audio technology (and jazz guitar) in college, I had the privilege to study under Bill Porter, the famous recording engineer who captured many hit songs by Elvis, Roy Orbison, and others. What I found so enlightening about my time studying with him was the fact that he came from an era before there was Pro Tools and other fancy computer software and effects. He taught us to listen to a room and use physical objects to tune it. One of the tools he taught us to use was a Helmholtz resonator (or absorber in this application). We used different sized containers and objects and cut different size holes or ports in them to absorb different frequencies, and sometimes filled them with fiberglass insulation if needed. Then we placed them in different locations in the studio to help balance out the mix of frequencies in the room or kill other anomalies like flutter echo or maybe a certain drum that was hitting a overly active frequency, etc. It amazed me how a little bit of close listening, a touch of math, some attention to detail, and some simple trial and error could drastically improve the sound quality of the recording we were able to get, and all without anything digital other than the old reel to reel tape machine we were using. (Read More About Bill Porter Here)
Having that background, I always thought of the inside of the guitar much like the inside of a room and did what I could to tune it and get it sounding good to my ear. I say “tune” it in a loose way, I just want the relationships of the top, back, and body cavity resonance to sound pleasing together. I do listen to what the main notes of these components are, but not in a strict scientific way. I’m just looking for what sounds beautiful and harmonious to me. I go into detail about this in my book The Art Of Lutherie and even demonstrate it in the companion DVD. One way to tune a Helmholtz resonator (which is kind of like a room) is to change the size of the hole (port) in it. Chances are you have already done this before, probably many times and didn’t realize it. Think about driving down the highway in your car and rolling the window down. At a certain point conditions will line up in a way as to hit the resonant frequency of the inside of the car and may even feel pressurized and uncomfortable as the waves start building. Instinctively you roll the window down more to see if it goes away, right? Or maybe even roll down another window. Changing the size or number of the holes(ports), tuning the space inside the car in a way to make it more comfortable. Taking this concept and applying it to my guitars has been a great tool to have at my disposal.
Trying The Adjustable Side Sound Port
When I saw the side sound hole in a guitar it reminded me of my days in college studying audio technology and looked to me like a great opportunity to be able to experiment with changing it’s size to see what the tonal effect would be on the guitar and it’s main resonances.
So after being inspired by John Monteleone’s guitar and also Linda Manzer’s guitar with the sliding side door on the sound port from the Blue Guitar collection, I decided I needed to give it a try on my guitars to really learn from it first hand. I even remember calling Linda Manzer and she was kind enough to give me some direction and guidance on building a sliding ebony door similar to hers which I thought was beautifully done.
The first one I tried was an archtop guitar with an oval sound hole in the top and a side sound port with a sliding door that could open and close. I wanted to use it on an oval hole archtop because I felt that some oval hole model archtops I had heard sounded a little choked (stuffy) sometimes and my feeling was that adding the side sound hole would help to open it up a bit and add some air space to it’s sound.
Enjoying The Sounds Of Autumn
So my 17” “Autumn” model archtop was born around 2002. It was a great learning experience and thankfully turned out to be a wonderful guitar and a step forward in my understanding and guitar building. Like many of the topics I often discuss, this is yet another one of those things that really opens your eyes if you try it on your own guitar. It’s great to hear it on someone else’s guitars and talk about the theory of it, but once you hear it on your work it’s well worth the effort to create it, even if you don’t use it again.
I built the first Autumn archtop for a collector and great player who I knew well and we were able to do many comparisons to other guitars I made, and many other wonderful guitars that he owned. Making those comparisons is a critical step in putting your work in a frame of reference to understand the direction your recent changes are moving your sound.
I was confident that it would have an effect on the acoustic sound, but one thing that shocked me was how much opening or closing the side sound port affected the amplified sound. Keep in mind it was only amplified with a floating humbucker. Plugged into the amp, there was a very noticeable difference when the sliding side soundport was open and when it was closed.
A “Hole” New World Of Possibilities
The final verdict is really just an opinion and a matter of taste of course, but to me the sound of the guitar with the door open was much more airy, natural, and open sounding. Not bright, but open. When the door was closed, I felt it sounded like guitar with the tone control turned all the way dark. You know that suffocated lack of airspace or no headroom kind of sound?
The owner of the guitar reported that after playing it every day for over a year he never closed the door again (other than to just try it briefly, quickly remembering why he kept it open) which made sense to me because I also felt the sound port was a big improvement to the openness and natural qualities of the sound. To watch a video in which the owner of the guitar describes a little about it in his own words – click here
I then went on to use side sound ports that were always open (no door) and never looked back. I even went to the extreme after studying with Boaz Elkyam and started using only the side sound port (no hole in the top) on my steel string and nylon string guitars, but that is a whole different topic for another article.
Are You Ready To Try A Side Sound Port?
Now that you have a little bit of background on how I ended up testing and using the side sound ports on my guitars, you might be interested in trying it on your own guitars if you haven’t already. You may even be using them already, but looking for a better and simpler way to incorporate them into your design and building process.
If you fall into any of those categories then you should definitely check out the following tutorial where I share my step by step techniques for structurally reinforcing the side of the guitar and cutting a side sound port. I do it all by hand so there are no dangerous routers or things like that, but it does take some patience and a little elbow grease to get it right.
Thankfully I’ve found some tricks over the years that I will share with you to make it easier for you and also help you refine the outcome. Plus I will show you 3 special tricks I use to ensure the side sound port is elegant, balanced, and properly prepped for applying wood bindings.
How To Make A Side Sound Port Tutorial
Reinforcing The Guitar Side: Clamping Caul
Before we can cut a hole (sound port) in the side of the guitar it is advisable to strengthen the section of the side where the sound port will be. This helps to make up for the loss of structural integrity caused by removing the guitar side material for the sound port. For this I laminate at least two layers of material to the inner part of the guitar side.
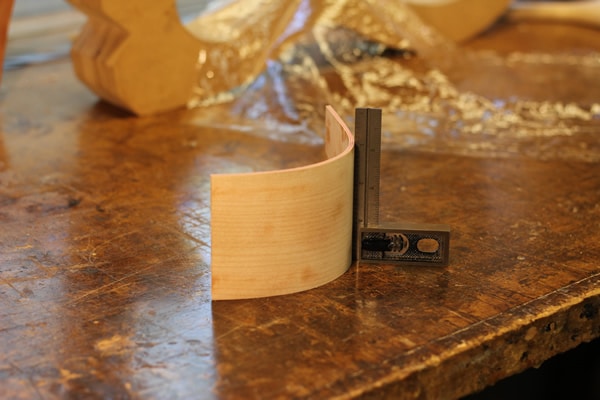
In order to simplify the laminating process I first make a clamping caul that fits perfectly with the curvature of the guitar shape. I’ll show you the steps to make the clamping caul like the one pictured above first, and then we can move on to the actual laminating process and other steps to making the side sound port.
The first thing I did was determine about where the sound port will be on my guitar side. Then I added about an inch to each side of the sound port length. This is approximately how big I will make both my clamping caul and also the actual veneers I will be laminating to the side itself in order to strengthen it and make it easier to bind. (I make mine roughly 2″ longer than the port and 1/8″ taller than the sides)
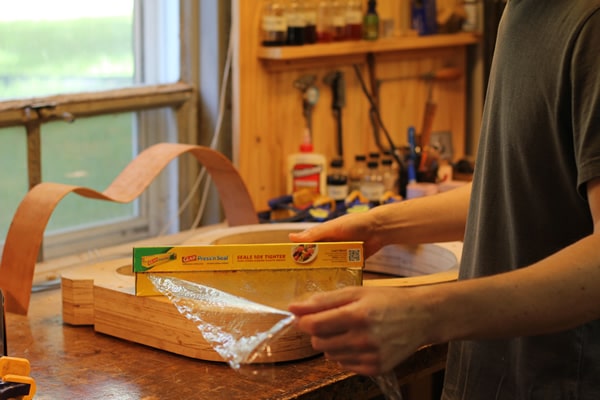
*NOTE* The process starts with some plastic wrap from the grocery store. It’s very important to be thinking ahead when doing this, it is critical that the surface of your guitar mold is protected from the epoxy or you could potentially ruin the mold or in later steps glue the guitar side to it, both of which would be a tragedy, so be cautious and conscientious about how you are protecting both of those surfaces. Keep the glue where you want it and no place else.
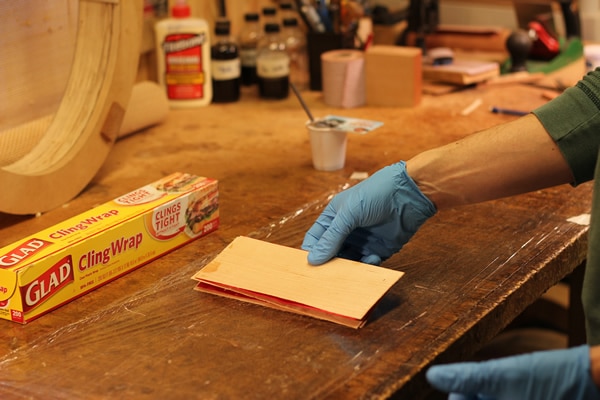
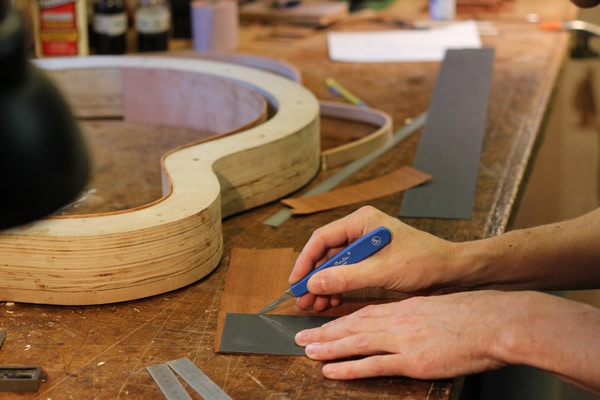
I cut my veneers for the clamping caul with a scalpel or Exacto knife. I alternate grain direction of each veneer for strength. For this example I am using an old piece of colored veneer that was leftover from some rosettes I made a long time ago. It makes it easy to see the different layers in the photos.
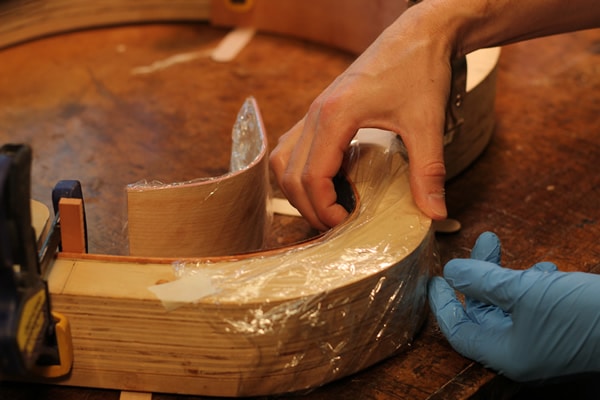
Notice the plastic wrap taped to the workbench? It serves two purposes; 1 – It protects the bench from the epoxy. 2 – It will act as a wrapper to wrap up the veneers to contain the epoxy while we clamp it into the guitar mold.
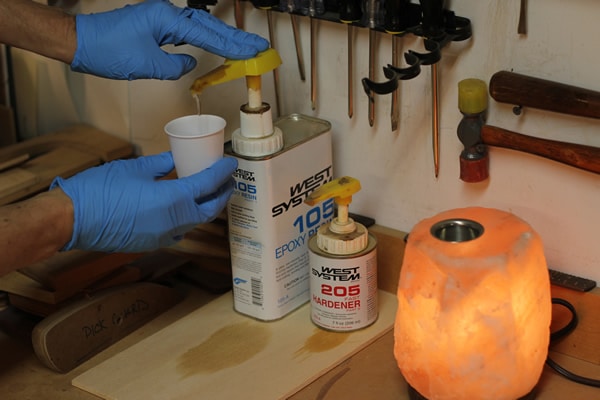
I like West epoxy for this. If you use West, I definitely recommend buying the pumps to go with it, it makes proper mixing so much easier. You can use other epoxies if you need to, just make sure they have enough working time for you though. This 205 West hardener seems to have just the right amount of time for me.
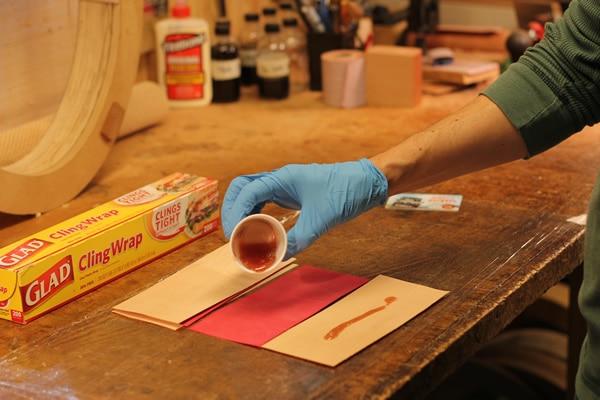
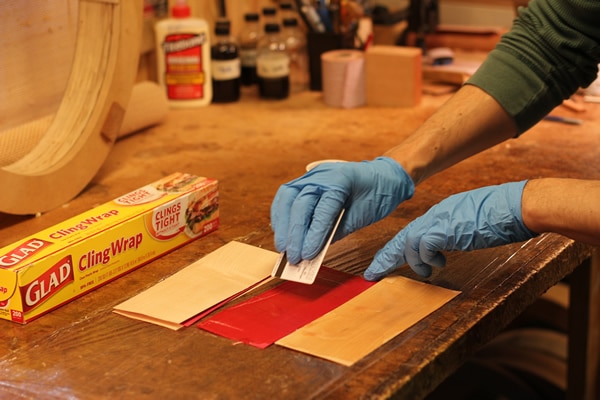
After a minute or so of thorough mixing of the epoxy, I pour a little on and spread it evenly with an old credit card. I collect all the ones they send in the mail for different things, If you do, you’ll probably have a life time supply like I do. I apply the epoxy lightly to both sides of each veneer.
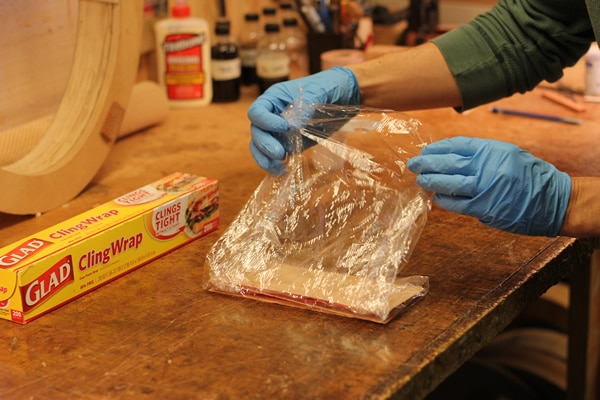
Once my epoxy is on, I loosely wrap up the stack of veneers allowing enough room for the glue to squeeze out and stay contained inside the plastic wrap.
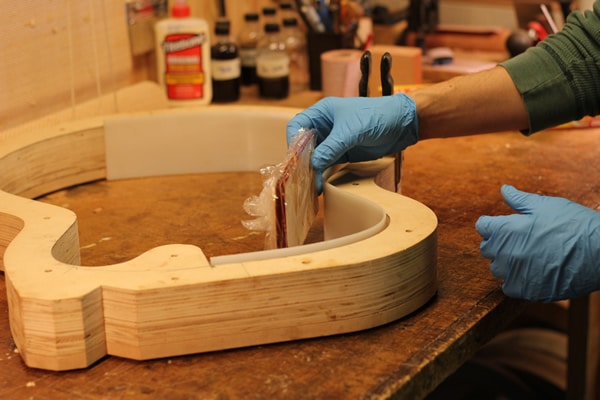
Before I place it into the mold I put a 3/32″ sheet of HDPE (high density polyethylene) to help protect the guitar mold, but also to simulate the thickness of the guitar side, thus making the shape of the clamping caul more accurate. If you tried this without the HDPE, then the clamping caul would not have a tight enough curve to properly fit once the guitar side and veneer stack were put in place. So this is a very critical step, and I have to mention one more time; make sure you don’t accidentally glue anything to the guitar mold!
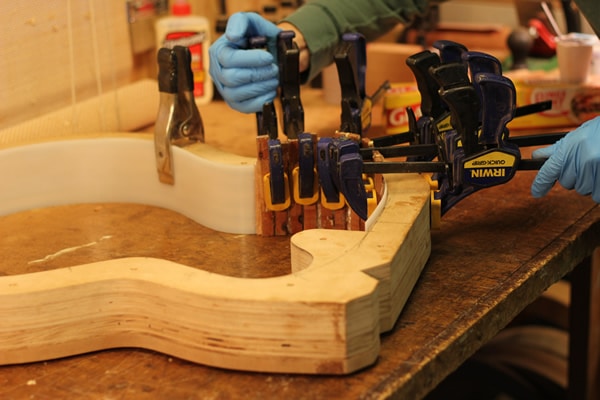
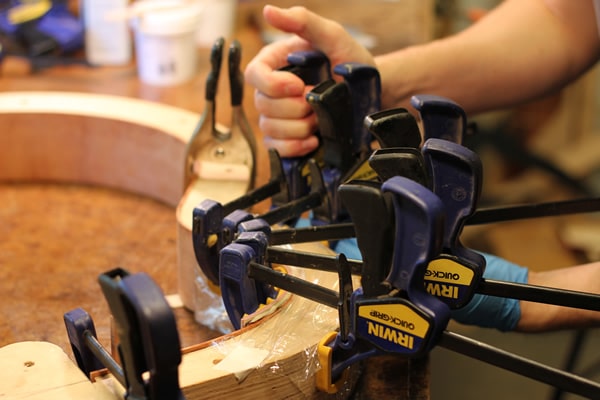
I use the same wooden strips that I use for making my solid guitar linings to even out the clamping pressure and press the veneers in place tightly, they are about 3/8″ X 5″ in length. They are around 1/4″ thick and they have some Scotch tape (packing tape works too) on one side to prevent it from being glued to anything.
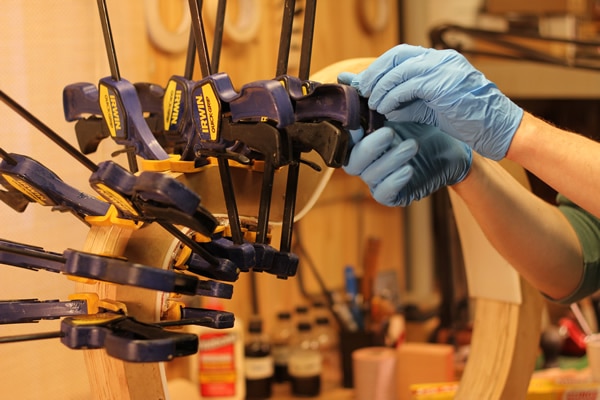
I then add some extra clamps to the opposite side as well to even the clamping force and spread out that epoxy. The plastic wrap hold the squeeze out inside and keeps it from being a big mess.
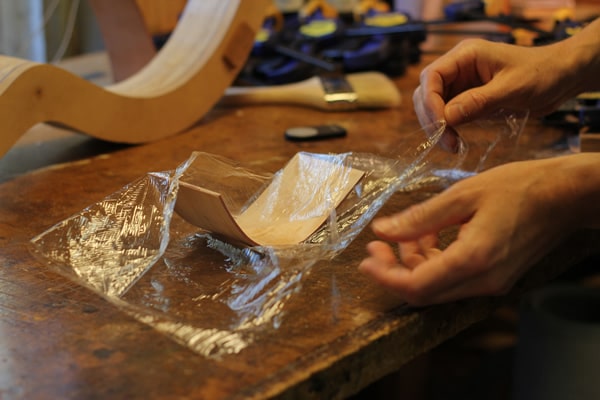
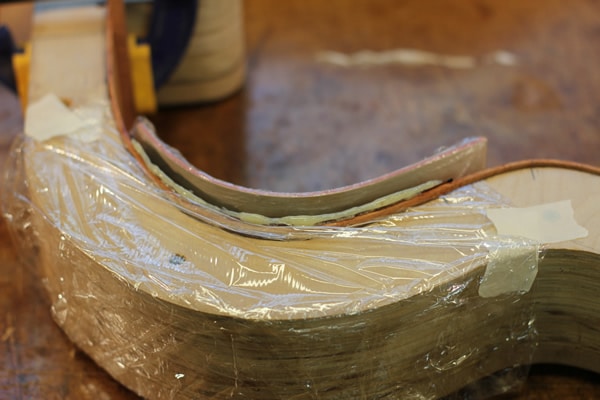
The next day I can take out the new clamping caul and unwrap it. (this photo is staged, I forgot to take the picture when I first took it out, yours will look a lot messier). Once I remove the plastic wrap, I use the belt sander to clean off the excess epoxy.

I lay it on the bench and check it with a square to make sure I have the sides nice and straight and clean. Now I am ready to use this to glue on the veneers that will reinforce the sound port area of the guitar side.
Reinforcing The Guitar Side: Laminating Veneers
To add the strength needed for the sound port, I add at least two layers of material to the inner portion of the guitar side in the spot where the sound port will be. How much material and what kind of material you use will depend on your final design of the sound port. If you will not be using binding then you might want to use a veneer of matching wood for the inner piece, possibly even one of substantial thickness to give the guitar side a stronger appearance and giving you more thickness to round over with your files as you finish up the details of the sound port’s edge.
I will be binding this sound port with wood binding and perfling so I don’t need too much thickness and I also do not have to worry about the color of the material I use as the edge will not be visible and will be covered by the binding treatment.
*NOTE* I am using solid linings on this guitar which are very strong. If you use triangle or traditional kerfed linings you might want to use more layers of veneers or thicker veneers to add strength since your kerfing will not have as much inherent strength as the type I am using in this tutorial. So please keep that in mind. Because of my linings the structural requirements of my side at this point are pretty minimal , but it will not be the case for you if you use other lining or kerfing styles.
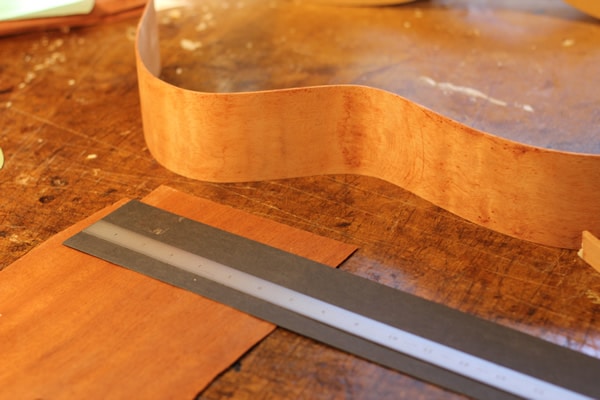
The materials I usually use for my sound ports that get bound with wood are two layers of veneers each about .020″ thick. I like to have the middle one oriented in a cross grain direction. For this one I will be using some cross grain mahogany and for the inner part a piece of vulcanized fiber. If you haven’t used vulcanized fiber it’s pretty cool stuff. I will be doing some writing and tutorials involving it very soon. You can find it at LMI if you want to try it out.
I cut out the veneers with a scalpel and then test them to make sure they fit. I want them a little bit wider than the sides. Remember I mentioned earlier when making the clamping caul that I added about an inch or more to the length of each side of the sound port. So for example if the sound port is 5″ long (which this one happens to be) I want the area I reinforce to be at least 7″ long with about 1″ on either side of the port opening. I make my veneers roughly 2″ longer than the port and about 1/8″ taller than the sides.
Next It’s Time To Prep For Gluing
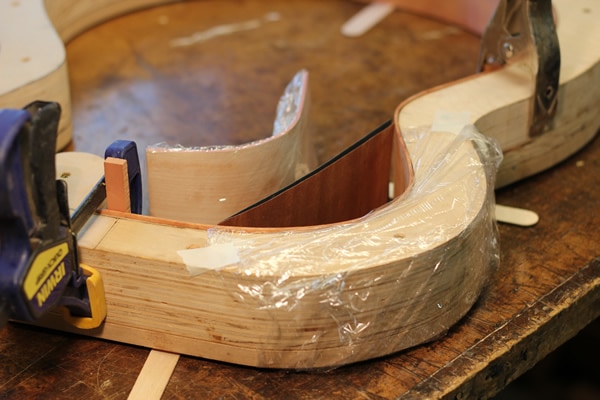
Look closely at the image above, there are some very important things to note:
1 – The guitar mold is wrapped in at least one layer of plastic wrap and taped in place. Don’t take a chance that could lead to gluing the guitar side to the mold. The epoxy can penetrate right through the wood, so wrap it well, but be sure you don’t over do it so much that there are ridges or lumps of plastic wrap or they might get laminated into the shape of your guitar side.
2 – The clamping caul is also wrapped in plastic wrap and taped in place for the same reasons as above.
3 – The guitar side is clamped into the correct position in the mold.
4 – There are strips of wood holding the guitar mold and sides up off the workbench. I want the veneers hanging down just a bit below and above the guitar side so I can trim it back flush when I’m done and the epoxy has hardened.
It isn’t as visible in the photo, but I marked the position of my sound port on the guitar mold so I can reference those marks as I position the veneers in to glue them in place.
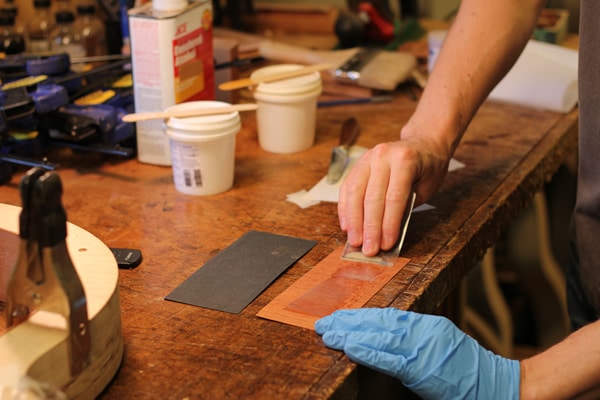
I mix up my thixotropic epoxy for this operation. I use the thixotropic here because it doesn’t run and make a mess, and it fills any small gaps that could possibly happen if things get weird. I use a brand called Super Bond made by Fiberglas Coatings, but any thixotropic epoxy will do. You could use West Epoxy, but it’s just harder to keep from running all over the place. Whatever type you use, make sure it has the proper working time for you to get things in place. The same method of spreading with the credit card is used here.
After the glue is on (use it sparingly this stuff is strong and too much is hard to squeeze out) I place it in the mold against the guitar side and slide it to the right position according to my marks I made on the mold.
Then I evenly begin applying clamping pressure. Lightly at first until all clamps are on then gradually increase force on each clamp.
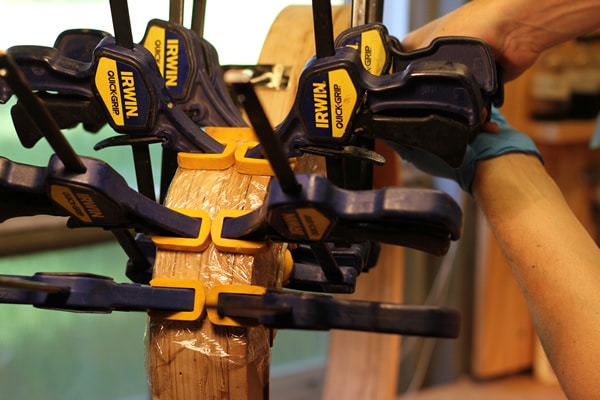
I stand the mold up and add more clamps to the other side to even things out and then tighten everything down all the way.
The next day I take off the clamps and I am ready to remove the guitar side and clean it up.
I then clean up any squeeze out and make it look nice with a file.
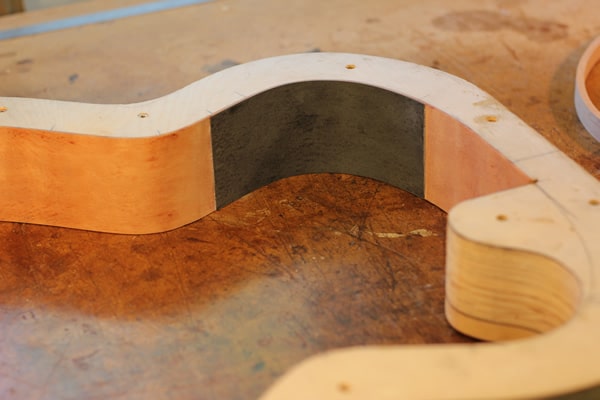
Here it is now all cleaned up and ready for the next steps. Notice I did this to the side before I glued in the neck block, tail block or linings, which makes it much easier to deal with and accomplish with precision.
Hand Cutting The Sound Port
After the guitar side is reinforced for the sound port, I glue in the neck block and tail block, and install the linings. I also sanded the gluing surface of the sides/linings so they are ready to receive the top and back plates. This is an archtop so the sides are sanded on a flat plane, but for a steel string you might be using a radius dish to sand and prepare this. Having the sides sanded to the final size is important because I will be using this as a guide as I lay out the size of the sound port.
I use the binding router bit sets from LMI and because of the way the bearing is made in relation to the cuter, coupled with the depth of my binding slot and the thickness of my top plates, the thinnest I can make my guitar sides at the edge of the sound port is .5″.
I make a mark where the binding depth will be and hold the router bit in place to double check. I am trying to make sure that the side sound port won’t interfere with the cutting of the binding channels. Double checking is always good.
Once I am feeling confident about my design and I am ready to cut, I find a suitable piece of backing material for the drill bit to drill into a little as it leaves the side. This minimizes chipping and makes a safer, cleaner hole. The size isn’t important as long as it’s big enough to get my coping saw blade through to start my cut.

I put a little Bur-life on the blade to help lubricate the cut if necessary and I just carefully cut out the hole staying about 1/16-1/8″ away from the line just to be safe.


Then I clean up the hole with my files. I start with the rough luthier’s files from Stew-Mac and also the rough nut file is a good one too and doesn’t chip as much. One reason I like the Vulcanized fiber is because when I file at this stage it won’t chip like some woods will when used for the inner veneer.

Lots of careful filing later my hole is looking pretty good. But I did cut into my linings a little so I need to work on them also to make them look nice.

3 Special Steps To Refine & Prepare The Side Sound Port For Binding
By this point I have the shape very close to being done, but if I take just little bit more time to refine and make subtle adjustments it will take the final product from being good to being great. I have some special tricks to show that I use to help me do just that.
1 – Establish Reference Points
Without some type of grid to reference it is hard to make any measurements that are meaningful. This is an important part of design that can be used in many aspects of designing and building your guitar.

I first make a reference line in the center of the sound port, and also two other lines equidistant from the center at a place that I think will be useful as I refine this shape.

Now I can use those marks when I take measurements and make accurate comparisons to be sure I have things balanced and elegant.

2 -Finessing The Linings & Binding Surface
In the next step I make sure that the linings inside are rounded over in a pleasing way and most importantly, I make sure that they are angled back enough so that they will not interfere with the binding I will be adding in later steps. To do this I make pencil lines across the surfaces to give me something easy to see as I make the final adjustments to these angles.
Then I start with my half round luthier’s file, paying close attention to the angle I am using and remove the material from the linings and refine the look and flow of the shapes inside and out.

I follow up with sandpaper on various pads to take out the file marks and make the last subtle changes to the shape to smooth it out.

Because the sandpaper has a tendency to make a rounded surface and to ensure a good gluing surface, I make a couple light passes around with a small sharp scraper. I pay close attention to the grain direction , and the goal is to leave a smooth flat surface for gluing in my binding and perfling.
3 – Seeing Whats Actually There
The last step is to sand off the pencil lines, being very careful not to rock the sanding block and take too much off of one side or the other.
I find that removing the lines helps me to see the real shape of the sound port. Sometimes the pencil lines themselves can create a little bit of an optical illusion. Sanding them off gives me a fresh and clear look at the shape and also prepares the wood to sealed before I use glue for the binding process.

Now the guitar side sound port is ready for the next steps.
Get The Full Step By Step Tutorial
Learn about the benefits of guitar side sound ports and how to make one on your next guitar in the 52 page Tutorial
- How To make a special clamping caul for sound ports.
- Techniques for reinforcing the sound port area.
- How to cut a sound port by hand
- Tricks to take a sound port from good to great & prep for binding
- And More


