
Guitar linings used to strengthen the glue joint between the top or back plates and the sides of the guitar, sometimes referred to as “kerfing,” are a very important component of any acoustic guitar. At first glance, these design elements don’t seem all that important.
I mean, after all, they are inside the guitar, and most people don’t even see them, right?
However, if we look closely and carefully analyze how they are functioning within the guitar system, we can begin to catch a glimpse as to how far-reaching and important the choices we make in the design and make-up of our linings can go in shaping the tonal and responsive qualities of our guitars.
Guitar Linings & Kerfings 101
Let’s start with some basics in case you’re thinking more seriously about the guitar’s linings for the first time.
If you’re like me, when you built your first guitar, you just used whatever type of linings that the book or luthier you were learning from recommended. No problem there, that’s where we all start, and it’s a good place to be.
Even though I started there, as time went on, I began to think more deeply about every element of the guitar and began to wonder how each of them worked within the guitar’s unique system. In the case of guitar linings, I took the same approach as I always do, which is: learning by doing.
My Personal Journey
I wondered what the effect of using different designs or woods for the guitar linings would be on my guitars, and I knew there was only one way to find out. So I started to build guitars with different styles of linings, some with kerfed linings, some with reverse kerf, some with mahogany, some with basswood, etc. Then came my custom-made versions: walnut, Spanish cedar, oak, and on and on. After that, I even listened to and tested different types of glues applied to different linings (each glue has its own sound, too).
As the years went by, I carefully planned out my experiments so I could measure the results of each new change in each new guitar (not just in linings but in all different components of the acoustic guitar). Each time I used something different, I paid close attention to the results and effects and took detailed notes of what I observed.
This process continued for many years until I hit a point where I felt like I had the perfect combination that I loved for both the construction of the linings and the way it drastically improved the feel, responsiveness, and voice of my guitars. I started building full-time in 1998, and this process of learning by doing is still going strong now as I continue to refine and test every single component of my design, and it probably will continue as long as I’m alive.
No Man Is An Island
I also had the good fortune of talking with some brilliant luthiers like Greg Byers and others who generously shared with me some other valuable information on linings that helped guide me and verify my observations and data that I was collecting. It’s important to share these things with one another because it is easy to lose perspective when working so closely on your guitars and hearing them day in and day out. Having another experienced and intuitive luthier to give you their own feedback they observe in their work is critical to making sure you stay on course and grounded in reality and rooted in a traditional sound, too.
Before I get into more detail about what I do, why I do it, and how I do it, let’s take a look at some different types of linings, and I’ll share my take on them and their uses.
Types Of Guitar Linings
 Just to clarify my language here, I‘m defining all the different designs of this category as “linings.” Sometimes, they are referred to exclusively as “kerfing,” but I think calling the whole group “linings” is the best way to address the group as a whole for the purposes of this series.
Within this overall group, I am subdividing the different designs/styles into 4 subgroups:
- Tentallones
- Kerfed Linings
- Reverse Kerf Linings
- Solid Linings
Let’s look at the most common group first, the kerfed linings, and I will also be giving a brief overview of the effect that each has on the guitar as well. It is briefly touched on here because we will be looking much more deeply into the physics behind why I feel the linings are important to consider when designing your guitar in Part 2 of this series.
Also, please keep in mind that what I‘m discussing here is based on my personal observations as I used the different styles of linings in various guitars through the years. I also took notes when playing guitars by other builders to attempt to understand and digest this as best as I could intuitively and intellectually. So far, my observations have served me well for my own work, and my hope is that it will benefit you and your guitars, too.
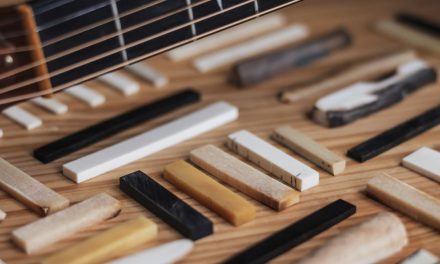
(image: LMI)
Tentallones
 This traditional style used by the old Spanish masters, such as Torres, is done by simply gluing each piece in one by one and holding them in place until the glue is beginning to set. This style adds the least amount of stiffness to the guitar sides and also adds the least amount of strength or support to the perimeter of the soundboard or guitar back plate. Most often, it seems that a lighter wood, such as basswood (lime) or spruce, is used for this type of lining.
I found that it produced a lighter-weight guitar with a softer perimeter. Giving the soundboard a more spring-like boundary seemed to reduce sustain and make the guitar more prone to deformation of the top as the guitar sides and body shape gradually shift under string tension over the years. This type of lining helps to produce the wonderful and traditional Spanish guitar sound and feel we all know and love in those instruments.
Triangular Kerfed Linings
 I haven’t researched the history of guitar kerfing in this regard, but it is my assumption that installing the tentallones one by one was not the kind of thing that could efficiently be done in production settings such as the early luthier shops trying to produce more guitars.
So how could one install the tentallones faster, be sure they were glued properly to the guitar sides, and be able to bend them into shape without heat or other equipment? By kerfing them, of course!
The triangular kerfed lining is probably the most traditional for steel string guitars and might still be the most commonly used, though I don’t know for sure. The interesting feature to note is that the un-kerfed portion gets glued to the guitar side. This adds the least amount of stiffness and rigidity to the guitar’s rim and does little to hold the body shape in place structurally. With this style of kerfed lining installed, the guitar sides must remain in the mold until the top and back are glued in place in order for them to keep the desired shape, as this type of lining isn’t sufficient to hold the guitar sides in place by themselves.
This style helps to give the guitar the traditional Martin type of sound and feel that we all know and love, as well as remains lightweight and easy to work with. Because of the triangular shape, the stiffness and mass along the perimeter of the soundboard is minimal, and it retains much of the qualities found in the Tentallone style of guitar linings.
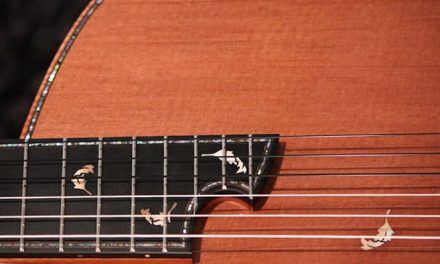
(image: StewMac )
Reverse Kerfed Linings
 The reverse kerfed lining is glued in place with the un-kerfed side out toward the inside of the guitar body.
First and foremost, it’s just a whole lot easier to glue and clamp in place than the triangular style of kerfed linings, which in and of itself is a great benefit, especially for a new builder just starting out. Having the kerfed side glued to the guitar side has other benefits, too.
It helps to add stiffness and strength to the body shape and stiffens the guitar’s perimeter at the critical point where the top or back plates meet the sides. I feel this takes some of the structural load off the top and back plates since the stiffer rims can hold their shape more independently.
I feel this adds more sustain to the guitar, a clearer, more defined bass, and stronger trebles. Overall more efficient and responsive, and again, remember these are my personal observations and tastes. When I switched to this style, I felt it was a step in the right direction, moving closer to the sound I was dreaming of in my heart and mind for my guitars.
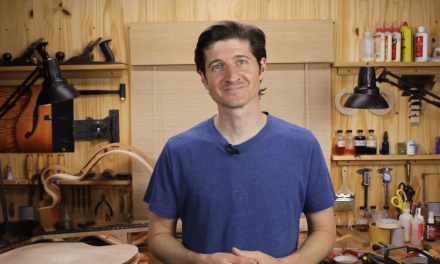
(image: StewMac )
Solid Guitar Linings
 Lastly, the solid linings are made from one or more strips of wood bent to the actual shape of the guitar body. They can be a single piece or several thinner pieces that are laminated together for even more strength.
There are no Kerf cuts (with some exceptions that you can see in the step-by-step tutorial below on how to make these solid linings coming in part 2 of this series) with this style since the shape is pre-bent into the wood with steam and heat.
This style adds the most stiffness and strength to the guitar sides and perimeter of the soundboard or guitar back plates. Switching to this style of linings was a wonderful breakthrough for my guitars and is what I currently use for all of my models.
I’ll explain why they are so beneficial as we continue our journey together here in this guide to guitar linings.
Why Are The Guitar Linings So Important?
The style and makeup of the guitar linings can affect the structural aspects and other properties of the instrument, such as tone and responsiveness, in several very important ways:
1 – On its most basic level, the linings help to increase the gluing surface area between the guitar sides and the guitar top or back plates. Without the linings, the thin sides wouldn’t have much of a glue joint to make a strong connection to the top or back plates and would likely fail. Not only that, but since oftentimes we route channels into the top/side and back/side joints to inlay the decorative binding and purfling strips, the guitar world literally fall apart when we cut into them there if it weren’t for the linings to add the needed thickness of the material.
2 – The second thing is a little less obvious, a lot more important, and is really the thing I want to focus on in part 2 of this tutorial; it is the way the design and make-up of the linings affect the tonal signature and responsiveness of the guitar.
If you’ve read my book “The Art Of Lutherie,” published by Mel Bay Music, you might recall the section in which I explained these concepts and even demonstrated some of them in the included DVD part of that set. The rim of the guitar sides is just like the rim of a drum. The stiffness at that point, material density, and the linings’ shape all play into this equation.
The Diving Board Analogy
The best way I know of to explain this part of the guitar system is to use an analogy of a diving board. The diving board has two main parts: the board and the base.
The base is there to support the board and is also designed to enhance the desired performance of the board. The board’s shape is also a big part of the equation, but for now, we will be focusing on the base since it is analogous to the guitar linings.
The best diving board in the world, if mounted to a weak or flimsy base, will not function properly or at least won’t reach its fullest potential because much of the energy loaded into its system ( which, in this case, is a result a person jumping on it ) will be raised on the weakness or poor design of the inferior base.
On the other hand, if the base is solid, well-constructed, and anchored in place tightly, even an average diving board will function well. This is because the base is strong enough to keep the energy that is loaded into the diving board where it belongs: in the board.
A strong (stiff & dense) base acts as an energy dam and prevents much of the energy from leaking down into itself where it wouldn’t be as useful to perform the desired result of the system, which, in this case, is to spring the diver up into the air in just the right way.
Applying These Concepts To The Guitar
 The guitar top is similar to the diving board itself. We load it with energy from the motion of the bridge (which was set in motion by the strings – detailed explanation – Click Here). The guitar as a system is set up so that, ideally, the string energy is converted as efficiently as possible into audible sound, and at the same time, that sound is filtered or EQ’d by the luthier’s choices to result in the desired tone quality.
Much like the base of the diving board we discussed, the guitar linings are the base of the soundboard (guitar top). If the base is weak, then it allows for more energy to leak into the sides, where it doesn’t produce much sound and is mostly wasted.
If the base is strong ( by strong, I mean stiff and with greater density than the top material ), then it works as an effective energy dam and keeps more vibrational energy in the top so it can do what it does best and convert it into sound, both radiating off the face of the guitar and also pressurizing the inside of the sound-box, thus interacting with the back plate and other components of the guitar.
Guitar Design Considerations
Based on my experiments, a guitar with a strong lining will usually have greater responsiveness. In other words, it will react more efficiently and respond more dynamically to a lighter touch on the strings.
It will usually have more sustain and also more volume and dynamics because it’s simply more efficient in the way it is processing the limited amount of energy that is input into its system when the strings are set in motion.

Structural Considerations
Another aspect here involves the amount of tension exerted on the soundboard by the strings. The string tension for a steel string is around 130 lbs or more. It wants to distort the top, and as the pull force extends along the top, it eventually focuses on the perimeters and tries to change the shape of the guitar. If the sides are weak because of the linings, such as tentallones or regular kerfed style linings, then the responsibility for holding the sides in shape is left to the soundboard. This reduces its ability to do its real job: convert vibrational energy into audible sound.
If a reverse kerf lining is used, it will add strength to the guitar sides and perimeter of the soundboard. The soundboard is now more free of the duties of holding the shape of the guitar and can work more efficiently on producing sound.
If solid linings are used, the sides become very strong and dense. This further frees the soundboard and enhances its efficiency in processing the string energy in a much more effective way with less vibrational string energy leaking into the sides.

So, Which Guitar Lining Is The Best?
Well, this brings us back full circle to where I began my explanation on the topic and where I begin my discussion on many lutherie-related topics; you just have to try it to find out which is best for you.
I started with tentallones and built many guitars in the Spanish style, face down on a solera. Then I moved to triangle kerfing and then quickly to the reverse kerfing. All the while studying the differences in each guitar and comparing my observations and notes.
I then moved on to solid linings; for me, the move to solid linings was a big jump in the quality of my guitars. I also found that it fit well in my building style and was just a perfect match for me all around. That’s what you want to look for, the things that make your guitars better and that make your day in the workshop better, too, a win-win.
Over the years, I tweaked my methods of making and installing the solid linings as well as my preferences of wood types, etc., in order to reach where I am today, which is producing wonderful results and is fun and rewarding to build, too.
Ready To Make Your Own Laminated Solid Linings?
Get access to the complete step-by-step tutorial to learn proven techniques, tools, and methods for crafting solid guitar linings and improving your guitars when you join the Luthier’s EDGE.


