There are so many different types of fret saws today that it’s hard for new luthiers to know which ones to buy and how to use them. After all, cutting accurate fret slots is one of the most critical parts of building a great guitar, right?
Choosing the right fret slotting saw is one way to set yourself up to achieve the best possible results on your next guitar. In this guide to guitar fret saws, you’ll gain a better understanding of the features that make each type of saw unique and how to choose the perfect tool for your specific needs.
Having spent over twenty years in the trenches myself, I’ll share my thoughts and experiences on fret saws, I hope to bring you the real-world insight you need to help you make your choice a little bit easier. You can also check out my full list of guitar making tools in my Ultimate Guide To Luthier Tools.
Table Of Contents
This guide is not just for beginners. It’s taken me many years to uncover many of the subtler points of using my hand tools, fret saws included. It took many, many guitars before I eventually realized some of the critical pieces of information I was missing.
Once I did get a deeper understanding of the tools themselves and how to use them, the quality of my guitars (and my life in general!) took a quantum leap.
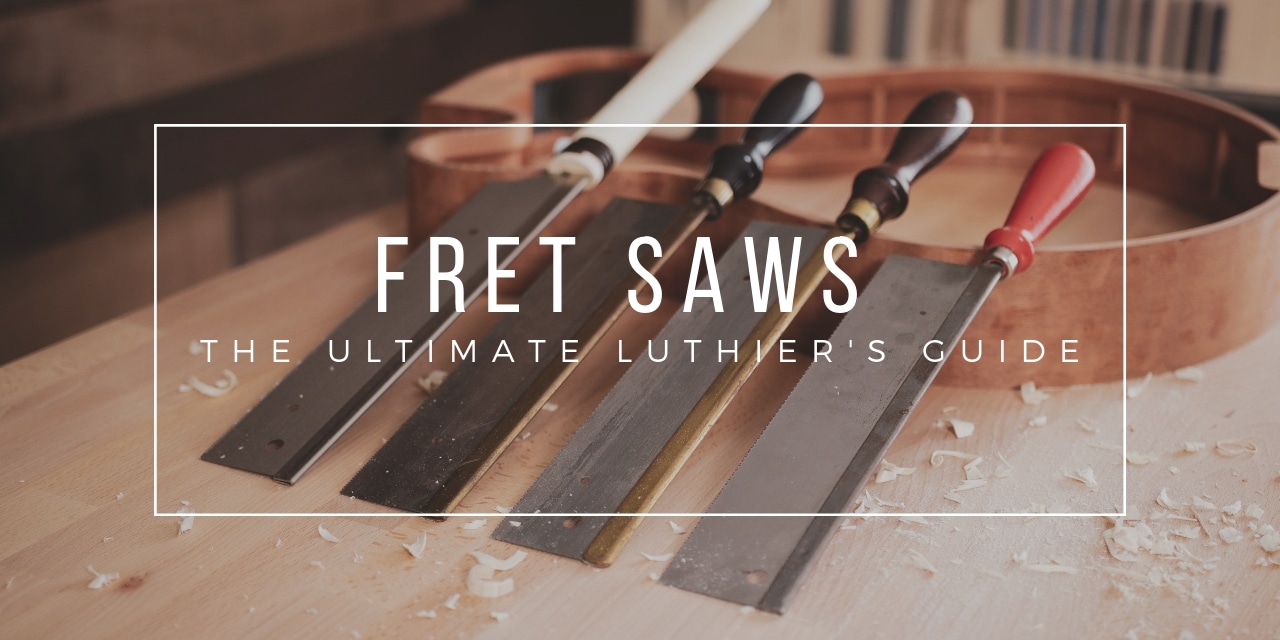
The Fret Saw
A guitar fret saw is a simple tool really; a handle, a blade with teeth, and limitless possibilities – that’s why I love it.
Mastering the art of hand-crafting guitars is not just about having the most complex tools and techniques.
The true secret to doing our best work—world-class work, work that matters—is all about mastering the basics and staying away from the overly-complicated distractions that surround us, attempting to entice us away from hunkering down and working on the task at hand.

You might be thinking, “Tom, chill out! It’s just a saw, man!” To me, I don’t just see the tool, I see another opportunity for me to refine a fundamental technique, that when mastered, can reap great rewards of accuracy and personal satisfaction.
All done simply and quietly. No loud sounds, no computers. Just you, the wood, and that still small voice guiding you as you watch your hands do the work they were made to do.
4 Key Elements Of Fret Saw Design
1 – Saw Kerf
The kerf of the saw is the cutting width of the blade, so it determines the thickness of the slot you will cut.
The saw you use, and the fret slot you create, must be properly fit to your fret wire for a snug, not too tight or too loose fit.
Most fret saws will cut a slot that is .023” wide, which is perfect for most fret wire and is the starting point for great guitar fretwork.

Here’s why it is so important: A fret that is in a slot that is too wide will result in a neck that lacks strength and in frets that tend to move or could even pop up, ultimately resulting in uncomfortable playability and lack of stability.
Conversely, if the fret slot is too small, the installed frets will compress the neck and cause a back bow which will ultimately result in uncomfortable playability and high action. Nobody likes that!
*For more on learning to master your fretwork check out our luthier training courses.
2 – Saw Tooth Design
There are two main tooth designs that one will commonly find in fret saws.
The most common is the Traditional Luthier Fret Saw Tooth. Each tooth is set to cut on the pull stroke and has a very slight alternating outward bend. This “outward bend” is how the kerf of the saw is established with this method.
One good thing about this traditional design is that these types of teeth can be sharpened and reset if needed (though not many people do that these days).

The second common type is the Japanese Fret Saw Tooth (the bottom one in the photo).
This type of tooth design is much different, having a superior cut (in my opinion). The drawback is that the teeth are very fragile and can easily be broken if misused. The Japanese style cannot be re-sharpened.
3 – Spine
The spine (or spline) is the part on the back of the blade which gives it its rigidity and strength. Saws of this design are commonly known as a Back Saw. Some saws have a full spine, others may have a ¾ length spine, and others may have no spine at all.

I find, for cutting fret slots, a very rigid full spine is essential to keep my cuts straight. It prevents the blade from curving, resulting in a buildup of heat and friction as well as the potential for a slightly curved fret slot.
For some flush cut applications, you need a no-spine saw which is typically of the Japanese style of tooth. Having at least one saw with no spine is a must in my opinion, though I would not use it for fret slotting because of the reasons mentioned above.
4 – Handle Design
There are basically two main styles of handles commonly found in guitar fret saws.
The first and most common is the classic rounded design. This type lets you wrap your hand around the end of the saw, creating a linear extension of your arm as you work.

The second handle type is the Japanese style. It’s much longer and gives the saw a sword-like feel.
Your grip and fret slot cutting technique will be different with a Japanese-style handle, which is wonderful for fret slotting as well as other tasks like trimming binding at miter joints and other precision operations.
Choosing The Best Fret Saw
There really is no “best fret saw.”
The challenge is to find the one that best fits your preferred style of cutting along with the specific application—and you’ll find many opportunities to use your fret saw that has nothing to do with frets!
I own several types of fret saws myself and use them all the time.
If you have taken any of my guitar-making courses, you probably know that the way I work requires stillness and quiet so I can be sensitive to the wood I am working with.
Every time I turn on a machine, it shocks my system with sound, vibration, and danger. It takes me several hours before I get back to the sensitive and peaceful state I need to be in to do my best work.
I reach for my fret saws (or the Japanese Dozuki saws we’ll discuss later) to make as many cuts as possible so I can stay in the zone.

When I built my first guitar in the mid-90s, I’m thankful there weren’t as many options as there are today.
The variety of fret saws available to you may feel overwhelming and intimidating, not to mention all the other tools and advice available to a luthier. I’ve been building guitars over the last 20+ years, and this is what my experience was like.
Traditional Guitar Fret Saws (My Starting Point)
I had experience as a finish carpenter, but I had a lot to learn and a lot of tools to buy. When I built my first guitar, I couldn’t even afford to buy a fret saw!
Luckily, I was able to strike a deal with a local guitar technician. He let me use some of his lutherie tools one day a week for a few hours for the cost of $20. It was like a weekly guitar lesson, only in my case, I got to use his small workshop and get a little advice along the way.
I only met with him a handful of times, but it was just enough to help me get the fingerboard slotted, along with a few other critical luthier-specific tasks like using fret crowning files, fret leveling, and other things that were outside of my previous woodworking experience.

It’s a nice little saw, and I used it on many guitars and repairs. Very lightweight and smaller than the newer models, it has its benefits for certain applications.
Eventually, I wore it out. It began to get too dull to cut ebony, so I started looking around to see what saw would be the right fit for the next phase of my journey into the art of lutherie.

The next saw I decided on was the LMI fret saw pictured above. This saw is a lot more substantial than my first saw, with every part denser and heavier-duty. It feels great.
The handle is a nice hardwood with a solid brass furl anchoring the spine and blade in place. It was a definite improvement from my previous saw, and I still use it all these years later.
Unfortunately, it’s too dull now for some applications. I eventually needed an upgrade and decided to try the Stew Mac version of this saw.

This fret saw from Stew Mac is so close to being the same as the LMI version I literally sometimes don’t even pay attention to which one I’m using.
The same great handle and stiff spine and blade make for a great saw. There is a very slight difference in the tooth pattern, but they both cut very well and have lasted about the same amount of time. Neither seems better than the other: both classic designs and quality investments, so you can’t go wrong with either one.
As usual, though, after many more fingerboards and guitars, again, this new version started getting dull too, and it seemed like a good move to try the one with the guide attachment next to help me get a more consistent fret slot depth.

This is the same great saw but with a depth slot attachment, the Stew Mac Fret Saw With Depth Stop. As I was writing this, I went to look for the attachment, but I can’t find it! After trying it for a while and struggling to get used to it, I eventually realized that it just wasn’t for me. Having the guide bolted to one side threw me off balance and blocked my view.
It did help me learn that I was perfectly confident in judging the depth of the slot by eye as I have always done.
I took away a valuable lesson: when you find something that doesn’t suit you and your style, it can actually help you define and refine your sense of style and identity.
Japanese Dozuki Saws
In 2000 I went to Baja California to study with Boaz Elkayam. When I was there, I watched him use a Japanese Dozuki saw like the one below to cut his brace wood to length, trim mahogany neck blanks, and several other tasks.

Being someone who needs quiet and simplicity while I work, I was instantly drawn to this type of saw. Incorporating it into my guitar-building practice reduced the number of times a day I turned on loud machines. Though I never could never use that particular saw for slotting frets because the kerf was wrong, the amazing cutting power of the super sharp teeth was intoxicating.

I wanted to cut fret slots with a saw like this. After I broke a few teeth on my first Japanese saw, I upgraded to the one above from LMI, but the kerf was still wrong for fret slotting.
Still, I use this saw every day for many different cuts: trimming binding, nearly all my guitar bracing work (tone bar article link), and cutting fret slots, too. I’d say it is one of the most used tools in my workshop, earning a premium spot on my tool wall.
The Ultimate Guitar Fret Saw?

Eventually, I found MY perfect fret saw. The StewMac Japanese fret saw with the right kerf for fret wire (.023”), pictured above. This one is a game changer—I use it for cutting my fanned fret guitar fingerboards, too, it’s just a really great tool!
It has beautiful, fast-cutting, non-clogging Japanese-style teeth. The handle gives me a great sense of control and stability, allowing me to do better work with a much more relaxed grip than I need for other saws.
Unlike my other Japanese saws, this one has a very stiff blade and full-length super rigid spine. It’s the perfect combination of all the greatest features from all the other saws mixed into one.
Fret Saw Technique
(Cutting with accuracy & efficiency)
Getting the perfect saw—is only half the battle.
No matter what saw you choose, a great deal depends on your sawing technique. Great technique is the “master key” to becoming a great luthier.
It takes a great deal of effort to master this subtle art, but with the proper guidance, you can start cutting like a pro in no time.
Are you ready to stop wrestling with that saw and struggling to cut those fret slots?
If so, I strongly encourage you to check out my course How To Build A Fanned Fret Guitar which includes a step-by-step video demonstration of the fret-sawing technique.
In it, you’ll learn my special approach to mastering the fret-sawing technique for the fastest, most accurate, and most efficient results on your next hand-cut fingerboard.
Final Thoughts
Which type of fret saw do you like best for fret slotting or guitar making in general?
Are there any saws that you think I should add to my list?
Please join in the conversation and leave your answers in the comments below. Remember to share this guide with your fellow luthiers and friends!
Fret Saw FAQ
What Is A Fret Saw?
A fret saw is a type of fine-toothed hand saw with a specific kerf size (cut size) designed for making intricate and precise cuts in materials like wood. Luthiers commonly use it to create narrow slots, called fret slots, in the fingerboard of musical instruments, such as guitars. These slots accommodate fret wire that the player uses to create different notes while playing the instrument.
What Saw For Guitar Frets?
For cutting guitar fret slots, a specialized tool called a “fret saw” is used. There are several main types of fret saws, each designed with a fine-toothed blade that allows luthiers to make precise cuts in the guitar fingerboard to create slots for fret wire to be installed. This tool ensures accurate fit of the fret wire tang and placement of frets on the instrument.
What Is A Fret Saw Used For?
A fret saw is a hand tool used for various types of woodworking and guitar building. It is a versatile tool that can be used for many different cutting applications when building a guitar. However, the primary purpose of this tool is to accurately cut accurately sized and positioned slots in the guitar fingerboard where the fret wire will be installed.
What Is The Difference Between A Fret Saw And A Coping Saw Blade?
A fret saw, and a coping saw blade are both tools used in woodworking, but they serve different purposes. For making handcrafted guitars, the fret saw is a complete tool with a fine-toothed blade and a specific width, used for making precise cuts in the fingerboard of musical instruments, like guitars, to create fret slots. A coping saw blade, on the other hand, is a removable blade used with a coping saw frame for intricate curved cuts and detailed woodworking tasks.


Thanks Tom, for sharing all the great work that you do. It’s so hard to find anyone in almost any field that knows or cares about what they are doing. I do some of the work on my own guitars that I can, but currently I do not own any of the tools that can’t be found at the hardware store or building centers .
Thanks Ron! So glad to hear that you found this helpful! Don’t let the tools stop you, it is great when you can get the special luthier tools, but until then, keep looking for creative ways to use what you have and keep going…that’s the key!
I think you meant traditional saws cut on the push stroke, I agree about the peace and quite,. Having been trained as a cabinetmaker 45 years ago though I was trained to be accurate and efficient, so I put up with an hour or so of table saw work to produce enough slotted finger boards for a year.
Hey Robert, Thanks for your comment! Yeah that does make a lot of sense to batch out those fingerboards. I do it by hand a lot because the scale lengths and are often different and I do a lot of fanned fret guitars too. I appreciate your comment about the saw cut direction and you are right, the traditional back saws do cut on the push stroke, however the traditional luthier fret slotting saws all cut on the pull stroke. So it’s a little difference in wording there, but the pull stroke cut and the specific kerf size are two of the very unique trait of the luthier saw vs a regular back saw. Thanks again!
Just wondered you said the fret saws got dull many times for ebony and you needed a new one.
Could you not just sharpen them back up with saw files in order to get the required sharpness for a fine accurate finish on ebony?
Thanks
Good question, I could sharpen them, yes, but then I feel like it is changing the kerf. Maybe not enough to matter in reality, but it bothers me still. So I just downgrade the older saws to be used for other stuff in my shop and save the fresh sharp ones for fret slotting only.
Thanks for all the great information and for showing us your meditative ways of working. Always an inspiration. I have sharpened even my japanese fret saws with great results. Maybe after enough times the teeth get uneven but until then they feel like new each time.
I am not a luthier but have somehow refretted several guitars over the past thirty years . I am now considering several guitars that I would like to plane the fingerboards prior to replacing the frets so it seems that I may need to deepen the slots
Of the various fret wire sizes I have researched there’s a monumental difference in the sizes of tang and presumably kerf so I would expect there would be saws available for cutting different sizes slots for different width frets
I am interested in understanding all this .
Hi Peter, You’re right it can be confusing for sure. I have two entire courses about how to make sense of it all and how to get great results on your fretwork consistently. You can check them out here: Fretwork Mastery Part 1 and Fretwork Mastery Part 2
Can you clear my query for the saw cut is straight while the fretboard get radius, if not using the Stewmac fret saw with depth stop, how to make sure we saw the fret slot depth align with the radius ? Thanks Tom.