
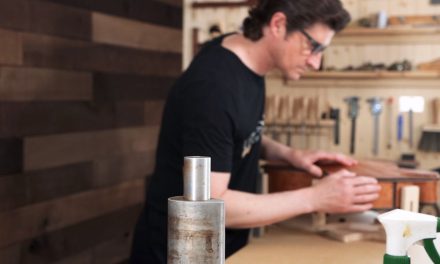
Installing your guitar purfling neatly and precisely in the bindings of your guitar is very important and can have a big impact on the perceived value of your work. One of the ways that many people will judge the workmanship and quality of your guitar is by closely inspecting your binding work. They want to see how clean and tight the bindings and purflings are inlaid and mitered. There are many subtleties involved in making these important elements look and feel right, but I want to focus in on the purflings here because the thin purfling stripes when properly fit and joined can take the instrument and the workmanship therein to a higher level of quality and perceived value.

I have gone through many different variations, trials, and errors in my process over the years to get to this one I am now using and it will likely change again as I learn more and find better ways. However this system has served me very well for many of my best guitars and I feel it has some extremely valuable techniques involved that you can use for this application as well as other aspects of your guitar building process to help take your work to a higher level.
My Precision Purfling Techniques – Fingerboard
I thought a simple fingerboard would be a nice place to start, then in the next part of this series I will share some tricks for getting the body purflings to be perfect too. As we begin here in part 1, I have already made my ebony fingerboard and have gotten it ready for purfling and binding. I did this by slotting my fingerboard blank, drawing the shape of the finished fingerboard dimensions, and then doing my inlay work. Next I subtract the thickness of my binding and purflings from the edges of the fingerboard, mark the lines, (but not the nut area) and trim it to shape. I usually do this on my pin router using my ultra simple jigs that I will write about very soon. In this case though, this is a short scale fingerboard with a custom nut width, and I don’t build many like this, so I made this one totally by hand with just the band saw, belt sander, and some elbow grease. Once I was sure things were just right and double checked my numbers, I was ready to begin installing the bindings and purflings.

The first step is to glue the purflings on the very end of the fingerboard. This makes things much easier because it’s the only part of this fingerboard that is mitered on both ends. It’s advantageous to glue this first and then fit the two side purfling strips to it because they are open on the other end and can be left long at this installation stage. After bending to shape on the hot bending iron, I glued the end piece using the same technique I am about to explain below. Next, I miter the ends using the reflection in my chisel blade as a guide to help be get the angle right. I then test the first purfling miter to see how its looking and decide what changes need to be made to get it flawless. Once it is just right I can prepare the joint for glue.
Safety First ! – Always use Cyanoacrylate (CA) glue and all chemicals in a well ventilated area with proper eye protection, safety equipment, and precautions
Accelerating the Work Flow

Portions of this next part are taken from a superglue binding method that I learned from my friend Kevin Ryan. Rather than using tape or clamps to hold the purfling in place while the glue dries we use the glue itself and a little bit of CA accelerator.

If you ever used CA accelerator before and maybe used too much, you might have learned the hard way like I did that it can be really dangerous and can leave that ugly white stuff in the joint. I find that if I spray one side of the joint with some accelerator and then wipe it back off with a paper towel it leaves just enough residue to make the glue dry quickly but with no white stuff, and at a much more controllable speed. By speed I mean I can stay ahead of the cure so it doesn’t glue the piece before I get it into position.
Secrets To Perfect Wooden Purfling Miter Joints

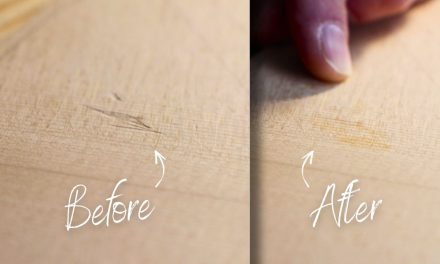
OK this part is super important. If you use any light colored woods and use CA glue, then you have to use this trick. The thin glue wicks into the light woods and changes the color of the end-grain revealing your miter joint and making it look crappy even if it was a perfect fit. On the other hand Tightbond (Aliphatic Resin) glue will actually swell the wood a tiny bit and seal the end-grain for you so the CA can’t get in. So I take a tiny drop of Tightbond and put it on the light colored Maple of my purfling.

I position the piece back in place, make sure it’s perfect, and then start adding some tiny drops of CA to tack it in place. The CA actually holds the purfling in place while the Tightbond dries in the miter joint. The Tightbond doesn’t dry on contact like the CA, this is good because I have a little time to move the piece around and make sure it’s just right so my miter joint is perfect. Once I like it, I can easily tack it in place with a drop of CA, that dries instantly because we have some accelerator residue in the joint still.

*Note* I make sure my purfling is just a tiny bit taller than the fingerboard so I can insert the tiny amounts of glue without it spilling over and gluing my fingers to it.
Then I work my way up the fingerboard keeping my left hand (being used as a clamp) ahead of the glue cure and holding the piece tightly in place as I tack it onto the fingerboard between each fret slot. Just a little glue is all you need and watch out because you can very easily glue this whole thing to your work bench. You may want to do this on a piece of HDPE or on some wood with some packing tape on it to keep from gluing it down. In case of emergency Acetone is a solvent for CA.
But, won’t that thin CA get into the fret slots!?
Yep, it will a little bit just on the ends near the purfling, but that’s a good thing and here’s why;
- I have to re-saw the slots with my fret saw to cut through the purfling so my frets can get closer to the binding anyway, and cutting this will also clean any glue in the slots.
- Some CA will wick into the wood at the ends of the fret slots and harden it just a bit. This makes it grip the ends of the fret tang better at those places and hold it in place more securely, which also helps to prevent those pesky fret ends that want to pop up sometimes.

Once the face of the fingerboard is all glued up I run a bead of glue along the back to be sure its all nice and tight, it only takes about one drop and I can let it roll right down the joint filling any place that wasn’t filled already. Keep in mind there are no gaps here, the joint is very tight, only the capillary action of the glue makes it possible for it to wick into the joint.
Repeating The Process On The Next Side

On to the next side, trimming up the joint with a 1/4″ chisel ….. still using the reflection in my chisel blade to help gauge the angles

I tried for a hole-in-one, but after testing it it looks like the purfling on the fingerboard end needs a slight adjustment.

Taking a tiny bit off the miter to get it just perfect, looks like I’ll have to settle for a birdie on this one, not too bad since it’s a par 5 😉 (Am I the only one who plays these crazy games while I’m working? Too much time alone I guess)

I make the final check with my magnification visor. I make it a point to always check my work under magnification, it helps a lot. If I know that it looks prefect under magnification I can feel really confident when the guitar goes out into the world that under the closest inspection it will stand up to the test and pass with flying colors.

Happy with the joint now so I can put on a light coat of the CA accelerator

Wipe it off quickly

Add my Tightbond to the Maple part of the miter joint

Get it in position, double check, ….tack it in place and then move on up the face of the fingerboard using the CA sparingly but also being sure that I use enough to firmly attach the purfling.

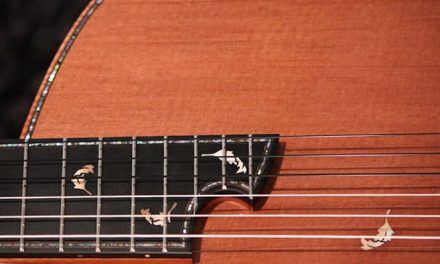
One last pass running a tiny drop of glue down the backside of the fingerboard and it’s all done! After I re-saw the fret slots in the purfling it will be ready for the Ebony biding treatment.
Get The Complete Tutorial When You Join The Luthier’s EDGE

Learn techniques and secrets to creating perfect purfling and miter joints around the fingerboard, guitar body, and other parts of the guitar in this 38 page tutorial containing Part 1, Part 2, of this series, PLUS the Luthier’s EDGE Exclusive Step By Step Photo Tutorial.
Learn More


Hi… just watched your purfling video. Where does one acquire that 1/4″ wide purfling?
Terry
Hey Terry,
You can get purfling made up already from StewMac or LMI. I make all my own stuff because I’m just crazy like that. I like to use special woods and re-saw them here so I can maximize shimmer and other effects by orienting the wood grain properly before I glue up the sheets.
Do you think my process for making purflings would be a good topic for me to write about in the future?
thanks for your feedback! Tom
Does the CA work for plastic binding? I’m putting a plastic turtle shell binding on on a Baritone Ukulele 6 String with a spruce top. It will look kind of like a miniature Martin 00-18.
I really appreciate you sharing your expertise. I look forward to eac episode.
Chuck
Hi Chuck, sounds like a cool project!
I feel kind of dumb because I have no idea……you know, I have never used plastic binding before….well actually once I did some repair work on one of Jimmy D’Aquisto’s guitars and had to match the plastic binding, but I used the plastic cement glue for that job and and it came out perfect. I recommend you take a scrap block of wood and rout your binding channels into it. Then glue one strip in with CA, one in with the plastic cement stuff. The next day rip them out and see which one holds better. That test wont account for heat and humidity, but it should give you a good idea as to how well the two are holding the bindings in place and maybe that can help you decide what to use. Sorry that’s the best I can do on this one, I have just been a wood binding guy from day one 🙂
Thanks!
Tom
CA will work on plastic bindings, whether tortoiseshell or ivoroid. It works well on finger boards and head stocks, following Tom’s thorough instructions. It can possibly be problematic if used on tops due to the fact that more of the CA will wick into the spruce, in your case, (or cedar, or whatever softwood species used) and may possibly cause discoloration or finish problems down the line. This isn’t so much of a problem on ebony, rosewoods, or other various hardwoods that typically are used elsewhere on the instruments.
One trick for plastics is to glue small sections at a time using standard wood glue- but wetting the inside face of the binding with a small amount of acetone. The acetone “melts” the plastic a bit allowing it to bond with the wood glue. The acetone flashes off fairy quickly, so it’s important to work in small stages until you get used to the process. It is also a great way to make joints in the plastic disappear, put a little acetone on each end and press them together. It should mushroom out a little bit, as the acetone flashes off it will shrink back some- also, for this reason don’t clean up the joint until it has fully dried. Similar to Tom’s caution about CA, it is best to use acetone in a well ventilated area with proper safety equipment.
Best of luck on the Bari Uke, Chuck! Enjoy seeing your process, Tom!
Hi Tom,
How fast drying is the CA glue that you are using, 10 second or 20 second? Thanks for all of your tips and techniques, I look forward to each of them!
Ken
Thanks Ken,
I am not sure, I would it’s instant. You have to get everything in place perfectly then drop in a tiny bit of glue. here is a link to the kind I use for this:
Zap CA Glue
https://www.amazon.com/Zap-Thin-CA-Glue-4oz/dp/B0006O8ECG
I started using the Zap glues because that is what Kevin Ryan uses and he taught some of these tricks to me. They work great!
Tom