
The caliper (sometimes spelled “calliper” or “calipers” with an “s”) is a critical part of the luthier’s tool kit. It gives us as craftspeople a superpower. With one, we can reach a level of accuracy difficult, and often impossible, to achieve with a ruler.
A mentor introduced me to calipers as I prepared to build my very first archtop guitar. Up until then, I worked as a carpenter and finish carpenter. I framed houses, installed fancy trim, and eventually worked with high-end kitchen cabinets that required a good deal of precision.
Even with that background, I still had never really needed the extreme precision that calipers afford until I took my first giant step into the world of handcrafted guitars.
As is often the case for many first-time luthiers, I didn’t have the tools necessary for building a guitar. At the time, it seemed like everything was too expensive. Though I did my best to scrounge and borrow anything I couldn’t afford, I didn’t have any luck finding calipers that I trusted. So, I decided to build one myself ….

My First Caliper
(How calipers can help you build better guitars)
You can build a guitar without a caliper and have great success. However, adding a caliper (or several) to your luthier toolset will give you some significant advantages.
- First and foremost, you can build your guitars and their respective components with a greater level of precision as compared to merely using a ruler.
- Secondly, certain types of calipers (that we will mention later in this article) will allow you to get accurate measurements impossible to get to any other way.
- Thirdly, a caliper can provide you with highly accurate records. Documenting critical measurements, and reflecting on them after the guitar is built, will help you learn faster and evolve more quickly as a luthier. (We cover my process for this in the Luthier’s EDGE online training courses.)
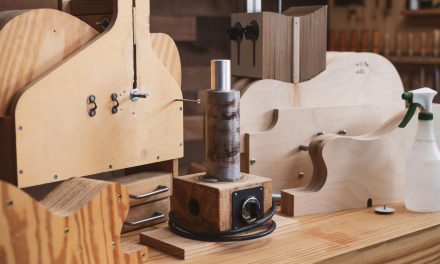
Looking back, I’m thankful that Bob Benedetto thought to include a section in his book, Making an Archtop Guitar, on how he built his own caliper for measuring the thickness of the top and back plates of his archtops. Without hesitation, I built my first caliper following his design as closely as I could.

Even though this was a DIY caliper and it’s pretty rough looking, it was a great experience on many levels. First, it produced a tool that gave me enough accuracy to get great results on several guitars. I used it to build until I could afford a better one.
On a deeper level, I learned I could get great results with any tool, even if it wasn’t perfect—even if it was one I crudely assembled with very little knowledge!
I was armed with the understanding that the tool itself doesn’t give me the power to do great work. That power must be drawn from within. It’s deepened the conviction that my creativity, resourcefulness, and belief in my vision serve me best.
I learned from day one not to depend on tools and machines. Instead, I discovered how to build from the inside out, trusting in my gifts and creativity over externals. Tools can easily become stumbling blocks if you can’t get what you think is the “right” one.
This effectively kills the number one excuse stopping most people from building a guitar (or whatever they wish to create). The belief that, “If I only had that tool, or that wood, or that thing , THEN I could do great work or start my project,” is just wrong.
With that out of my way, I was free to carry on in joyful lutherie bliss. A total beginner who didn’t know what he didn’t know, simply doing the best work he could with what he had.
And what a wonderful time it was!

Types of Calipers
My homemade caliper was working well despite its shortcomings. I used it for quite a long time, but I started noticing other areas of the guitar making process that would benefit from greater accuracy. Specifically, I needed new ways of measuring fingerboard, headstock, and neck thickness. Then, I realized more accurate measurements would help as I made purfling and bindings, laid out the tuning machines, and more.
It was clear I needed to get another type of caliper. There are a few types of calipers that would work, but none of them seemed like a good idea to build myself. So, this time, I decided to buy one.

I started by looking at the different types and finding out which design would help me the most. I was mostly looking to measure outside dimensions. However, I still wanted to have the options of measuring inside and even take some depth measurements as well.
The classic 6″ Caliper seemed like a great size and design for guitar parts, so I began my search there.
Here’s what I found…
The Vernier Caliper
I remember looking at the Vernier style caliper. Having no background or training in any of this stuff, my first impression was that it seemed overly involved with the two different scales and lots of numbers and lines.
As I am looking at it again all these years later, it looks relatively simple and actually gives me some new ideas, but I guess back then it just didn’t appeal to me at the time.
It just goes to show that no tool is perfect, and sometimes one is not technically better than another. The key is finding the one that best fits you and your style.
As soon as I saw the dial caliper, though, it was a different story.

The Dial Caliper
The dial caliper looks like the Vernier but uses a dial that looks kind of like a watch face. The dial shows measurements in what is, for me, an easier way to accurately to read.
It didn’t take me long to decide that this was the one for me. Starting with a 6-inch dial caliper, it impacted my work immediately. Looking back, I think it had a lot to do with confidence as much as anything else. It wasn’t that what I was making was that much more accurate (although accuracy came more quickly), but I was more confident in my measurements with the dial caliper.
It was just so easy to use, I could now measure tricky things like the thickness of a guitar neck.
Because of its rounded shape, the carved neck of a guitar is difficult to measure with a ruler. With the dial caliper, however, it was ultra-simple and incredibly accurate.
I could even set it to a dimension, lock it in place, and then easily repeat that exact dimension quickly and with perfect accuracy. It was terrific for laying out headstocks and other tasks common to lutherie.
As time went on, I was completely hooked on the dial caliper. I even saved up to buy a Starrett dial caliper which I truly enjoyed using. (Starrett is a company I first fell in love with for their r16 rulers and their 4” and 6” squares, which I still use and highly recommend).
Unfortunately, I spilled an entire bottle of shellac on my most prized Sterrett caliper. The shellac flooded into every crevice and even down into the gears, rendering the caliper useless.
After several failed attempts to fix it, I accepted the reality that even if I did get it moving smoothly again, I would never trust it fully. I felt heartbroken to lose one of my most expensive and favorite tools from such a clumsy mistake.
Interestingly though, something good came out of my tragedy. By this time, many years had past since my first homemade caliper. While I had my nose to the grindstone building guitars, technology had advanced. I was about to discover digital calipers, now an excellent and affordable option.

The Digital Caliper
A few weeks before what I will call “the incident” (sounds dramatic I know, but I have a feeling if you’ve read this far, you can relate – leave your story in the comments just for fun ), my brother-in-law happened to leave his digital caliper in my workshop after we did some work on a project I was helping with.
Out of necessity, I grabbed the digital caliper to keep my work progressing. I have to admit I had some preconceived notions about digital. I felt like I couldn’t trust it as much as the dial version I was so used to!
After a few weeks, though, I discovered the glorious ability to go from inches to metric with the click of a button. Suddenly, a new world began to open up to me.
I did buy a cheap Harbor Freight dial caliper, just in case, but I hardly used it. The digital version spoiled me.

My Favorite Digital Caliper
Because digital calipers are pretty affordable, I was able to test out a few kinds over the years. I settled on one in particular that I absolutely love. It’s accurate, durable, and inexpensive (so I never have to get upset when I spill shellac on it or drop it!).
It’s the EZ-Cal by iGaging.
If you want to deck out your luthier toolset even further, consider the StewMac luthiers caliper. It looks similar but has a fret height measuring feature, which is super cool.
Mitutoyo digital caliper
And finally just in case you want the ultimate in digital caliper precision, then you need to check out the Mitutoyo Digital Caliper. This is the rolls Royce digital caliper, with extreme repeatability and accuracy.


All-in-One: Inside, Outside, and Depth Measurements
Regardless of which of these 6″ caliper styles you use (digital, dial, or Vernier), they offer great accuracy: inside the guitar, outside the guitar, and even for depth measurements.
They can help make your work easier and give you more confidence in its accuracy. You’ll be able to keep better records as you document each guitar, speeding your ability to learn and improve.
Two More Types Of Calipers
1 – The Deep Reach Caliper
Remember my DIY luthier’s caliper from the start of this article?
Well, I eventually upgraded to the deep throat calipers (12 1/2″ throat) from LMI. Even though it was a little expensive, I really enjoy using it.

In the case of guitar tops and backs, accurate measurements during the building process are less important. Since every guitar top and back is different, no two are ever exactly the same thickness by the time I am done.
Calipers function here as a trustworthy guide to help me check my progress as I work. They give me signposts along the way as I follow my intuition while working to bring out the best voice of each piece of wood.
The accuracy here makes me more confident in the readings I am taking. More importantly, it helps me feel good knowing that the measurements I am writing in my notes for each guitar are correct.
Having good notes helps me understand what worked or didn’t work on each guitar so I can learn more from each one. Subsequently, I can grow in my skills and the quality of my work. (We go into detail about this process in the Art of Guitar Design Course).

2 – The Hacklinger Caliper
Hacklinger calipers are not well-know outside of luthier and violin-making circles, but they are one of our greatest assets.
At first glance, they seem crazy expensive, being little more than a plastic tube with a magnet and a spring. BUT to me, they’re worth every penny.

A Hacklinger caliper gives me the ability to take accurate measurements of the thickness of the top and back plates of my guitars AFTER the body is glued together. As I continue to refine thicknesses and complete the last tuning of the top and back of each guitar, I can chart and record how the sound changes after each round of sanding and plate adjustments.

It helps me to confidently squeeze every last drop of voice and power out of each guitar. At the same time, I can add those measurements and observations to my records to provide me with as much information as possible. I reference these notes to improve future guitars or navigate toward a certain sound or voice—or any other result I’m after.
This is a big part of being able to get just the right fit for each of my custom guitar clients.
Final Thoughts On Calipers
I hope my story, and what I learned—including all my mistakes!—has helped you to learn more about calipers. Maybe it even helped you find which type is the best for your style of guitar-making. Or really any other kind of woodworking.
I’d love to hear your story, thoughts, and your recommendations.
Which type of caliper do you like best?
Are there any calipers that you think I should add to my list?
Please join in the conversation and leave your answers in the comments below. Remember to share this guide with your fellow luthiers and friends!
Ready To Take Your Guitar Building Skills To The Next Level?
Join Luthier’s EDGE and get access to a growing library of exclusive guitar making luthier courses, tutorials, and more.


Digital calipers rule, just more precise than the dial type, which I also have. I also use a micrometer, probably because I’m older and that;s what I started with. I gotta tell you, though, I still have no clue what a Hackinger caliper is or how to use it.
Thanks for your comment John! Yep, once you go digital it’s hard to go back. You know what you are right about the Hacklinger caliper, I think I need to add some more info on that. I guess it was clear in my mind, lol. That thing is truly a game changer for luthiers of all kinds. Thanks again!
I have had a Brown and Shape dial caliper for a few decades now, Recently I saw a photo of Jol Dantzig’s workbench when he was at Hamer, and low and behold there was the same wood box and caliper as mine, as well as the same model Petersen Strobe tuner. To me a good machinist’s caliper is essential to good measurement.
Hey John, I totally agree, quality calipers and quality tools in general help us do quality work technically with precision, AND they also just make me happy every time I see them and use them, which helps in its own special way too 🙂
Tom great article on the calipers – certainly will be in my tool box when I get started. Got a busy year ahead and then it is easier sailing and the opportunity to dive in to your course and build the first of many instruments. I really look forward to working with all the great people in the Luther’s Edge community….until then.
If it weren’t for cheap decent ones made in China, I probably wouldn’t have some that I customized for guitar work. I’m talking about the added notches at both ends, for measuring fret crowns, and fret height of installed frets.
Now, if I could only incorporate a digital indicator into a fret pressing tool, so I could see when the fret crown is fully seated, seeing the measurement as I turn the handle of the fret pressing clamp or whatever.