 Now that we’ve talked about many different options and important details regarding our wood guitar purfling in How To Make Guitar Purfling: Part 1, we’re ready to get to work and start making our own. In the tutorial I’ll be discussing these steps in detail and showing you many very important and even critical tricks and tips I use to make my wood purflings easier to make, to incorporate into my building flow, and of course ensure that they work well structurally(functionally) and look great too.
Make sure you pay close attention to the details as some aspects such as adhesives and special materials are necessary or the veneer stack will not work properly and could be damaged in the process.
* If you’re a Luthier’sEDGE member be sure to log in or download the eBook for full access to the special members only content. *

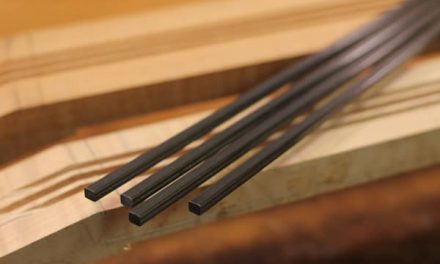
When making your own wood guitar purfling you allow yourself an unlimited amount of control over every aspect of the design. You can obviously use different woods to get different colors or shimmer effects, but you can even change the grain orientation of the visible purfling edge to get just the perfect effect you want. Notice how different the grain looks in the top two pieces in the stack of wood pictured above. They are both lacewood cut from the same log, but the top one is quarter cut on the edge facing us, and the lower piece is flats-sawn on the edge facing us.

Lacewood is an extreme example because it has such strong medullary rays as you can see in the photo above. They are so strong (visually) that it almost looks like the piece above is quarter-sawn on the wide face, but those are just the medullary rays not the grain lines of the piece. The quarter-cut face is the top, thinner face, and it cuts right across those rays giving maximum Ray-Fleck pattern in the finished piece. I really like the way it looks, and I make my purfling so that the visible edge of my stripes have this strong ray fleck shimmer as you might be able to see in the guitar pictured below.


Once I have my materials selected and my veneers cut and thickness sanded if necessary, I can get set up to glue up the stack. I make mine 3″ wide, it’s a good size for me to work with and makes enough purlfing for a whole guitar on most of my guitar designs. Sometimes a more complex design might need two of these 3″ wide stacks. The length is the same as the length I use for my bindings.

For most wood veneers a nice sharp scalpel and a straight edge are all you need to make the cut. It doesn’t need to be perfect because we will be re-sawing or re cutting this later anyway to make our purfling strips after the veneer stack is glued.
TIP: Don’t use your good straight edge for this, the blade will wear away at the edge and eventually it won’t be perfectly straight anymore, I use a dedicated aluminum yardstick I use for this that I got from Home Depot that has held up pretty well.

Once I have my pieces for the stack cut to width and cleaned up a little I am ready to measure them with a caliper to make sure the thickness of the veneer stack will be accurate after they are glued together into a sheet.

For this one, I want exactly .060″ so I as you can see this stack of veneers is a bit wider that I would like at this point.

Another great thing about the fiber is that is sands great on my drum thickness sander. I just walk over and run it though a few times with a finer grit paper on the drum sander and check until I get the perfect size. I already made my center wood veneer to the perfect thickness I want, so I am doing this final thicknessing to the black veneers, removing an equal amount for each side.

Now I have it just right and I’m ready to glue up the stack using a few very important tricks without which this wouldn’t be nearly as easy and wouldn’t look as good on the guitar.
Tutorial – Gluing & Cutting Wood Purfling Veneers
In order to make sure these are glued together properly and evenly so that the final thickness of the purfling strips are consistent, I have some tips and important tricks to show you as we go through the steps.

The first is using High Density Polyurethane (HDPE) sheets to glue up the stack. This offers me great flexibility in my options on how many stacks to glue at once, and ensures that the glue doesn’t seep out and glue the piece to the clamping cuals. If you use packing tape for this it would work the first time but in subsequent glue-ups it would get messy and ruined, then you would have to remake the cuals. With this method I can repeatedly clean the HDPE and keep reusing the same stuff over and over.

The clamping cuals are simply made of 3/4″ plywood strips just about 1/2″ wider and longer than my standard veneer stack size. You can see how warped they are lengthwise in the photo above. I like this because it helps to spread the clamping pressure more evenly across the length of the veneer stack.

I place a strip of HDPE on each of the two wood cauls to protect them. If glue does get onto the wood part I can scrape it clean or even run the whole piece through the thickness sander to ensure a nice flat surface.

If there is any glue residue on the HDPE, I can lightly pass the scraper over it and it pops right off. This is a great feature and makes this very easy to keep clean and use repeatedly.

OK, here is the next big secret that makes this whole thing work; you have to use a polyurethane glue like Gorilla Glue. This glue works in the opposite way of most other glues commonly used in woodworking. Water makes it cure, whereas many other glues work as the water dries. This unique glue is moisture and heat resistant, perfect to stand up to the process of heat bending we will be using to get the purfling strips into the shapes we need for the guitar body and other elements of the design.
[note_box]Tip: You have to wear gloves for this, if the Gorilla Glue gets on your skin it never comes off, it has to wear off and looks black like permanent dirt in your skin. If you do get it on you or anything else denatured alcohol is the best cleaner I have found and I use it to wipe off my bench after each time I use this glue.[/note_box]

I spread a thin layer of glue, just enough to coat the wood surface. I don’t want to overdo it because the glue expands as it dries and foams up something like three times it original volume. The behavior of this glue is one reason why the HDPE is a necessary part of this process. The glue can foam up and seep out all over, and if your not set up right it can glue the purfling right to the cauls.

Once I have it spread evenly, I carefully flip the veneer piece over so it is now glued to the bottom black veneer.

Spreading the glue evenly again on the opposite side, being careful not to use too much, but to just coat the wood and soak it in a little.

Once it is evenly coated I can place the next black veneer on and I am ready to clamp up the stack.
[note_box]Tip: If you want to make more than one stack at a time you can simply place an additional strip of HDPE in between each veneer stack so they don’t get glued together. I often glue a set of 3 stacks at once. I assume you could do more but I have not tried it. You’ll see that my clamps are not huge and powerful so I don’t want to exceed my clamping abilities by adding too many stacks of veneers at once.[/note_box]

I start the clamping process with some small plastic spring clamps. I start in the middle and work my way out toward the edges using the longitudinal warping of the cuals to my advantage.

I leave some space in between clamps so I can come back with my bigger clamps and add more pressure.

I add the Quick-Grip clamps again from the center and work my way out toward the ends. I go over them a second time to make sure I have then clamped down as tight as I can get them.

I add more plastic spring clamps in any place I can to even out the pressure. I like the plastic spring clamps because the Gorilla Glue doesn’t stick to them and can be popped off if it gets on there. I stand the whole thing up on a piece of scrap wood so that any squeeze-out that wants to run out will find its way down to the scrap-wood and not out the sides and onto my clamps or all over my bench or floor.

The next day, I peel off one layer at a time, being careful not to damage the purfling stack as I remove it from the HDPE strips.


Much of the squeeze-out can just be broken off by hand which I do in a matter of about a minute or so.

Then a quick pass on the belt sander and I now have a clean side edge for the band-saw guide to follow when I cut out the purfling strips.

You can see in the photo that the length of my inner veneer was longer than the outer black veneers. This is nice because I can see where usable part of the stack is as I prepare the edge for making the actual strips. I make the first cut just big enough to establish a nice straight line and also cut a little into the usable stack portion.

After that and in between most cuts I touch the edge back on the belt sander because I like a nice smooth edge on the purfling that is glued to the bottom of my binding channel. It isn’t necessary because I am using a fine tooth blade, but it’s just a nice thing that I like to do to make sure I’m getting a really solid glue joint when I inlay this into the guitar while I apply the bindings.
Another important trick for cutting the strips

As I cut each purfling strip. I use my right hand fingers to hold the strip and the veneer stack in the proper position relative to the saw guide behind the blade. In other words I want to make sure I am cutting straight, and if I don’t hold the strip right it could get wavy in the area behind the blade as it wants to flex into the space left by the saw-kerf.

It is especially important for the last part of the cut . If you don’t do it you’ll start to get an odd shape as any inconsistencies compound with each additional cut you make. For the last part of the cut, both of my hands are on the back side of the blade holding the purfling strip in place relative to the veneer stack sheet and the saw guide, and gently pulling it all though. It also keeps my fingers away from danger too.

I do a quick cleanup sanding of a few swipes with 150 grit paper.

The secret here is to always be pulling out from the spot where you are holding the purfling strips. If you push in toward your other hand that is holding the strips, they will catch and bend and possibly break.
After this I do one last step, and that is to run all the strips through my veneer thicknessing tool to make sure that the thickness is perfectly accurate and will fit with precision into my pufling channels on the guitar.

I mark the remaining veneers stack so I know which guitar it goes to and keep it ready for when I need it next. This veneer stack is also what I glue to my binding material to make side purflings.
Ready To Take Your Guitar Building Skills To The Next Level?
Join Luthier’s EDGE and get access to a growing library of exclusive guitar making luthier courses, tutorials, and more.


Trackbacks/Pingbacks