
In today’s article, I’m going to show you my simple system for creating beautiful side-purfling miter joint details:
- In less time
- With less stress
- More confidence
- More Consistency
The key is learning to develop system you can trust.
Quality work doesn’t happen by chance. It’s the result of a carefully architected approach and a reliable system.
When I started, I didn’t have a clearly defined system for doing this and had to “wing it” each time, hoping it would turn out OK.
The problem is, that when you’re flying by the seat of your pants, it sometimes works out, and you nail it.
And sometimes you don’t, and the miters look like crap, and it’s embarrassing.
But every time, it feels terrifying because you aren’t sure which outcome it will be.
(If it seems like I’m being overly dramatic, it’s probably because I went through that cycle over and over for years, and I remember it all too vividly.)
But I’m happy to report that there is a better way that I will show you today in this article.
Here’s how to get started step by step:
Step 1: Planning For Decorative Purfling Elements
The first step is to plan for the decorative elements that will interact with the binding and purfling. I use this process on every guitar I make. I love the way it looks, and I really enjoy the process.
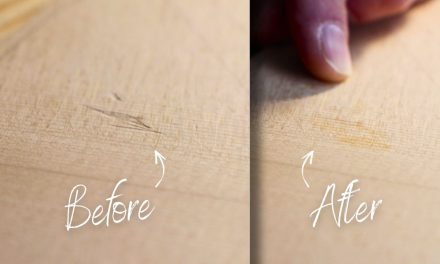
The image below and at the top of this article are good examples of what we are talking about. Notice the miter joint of the purfling and the fit of the wood bindings as they meet and frame the neck of the guitar.

It adds a touch of elegance, and if executed well, it also elevates the sense of craftsmanship and artistry.
If you read my article on cutting the engraft by hand, you already know how and when I prefer to inlay those elements.
We are jumping into the process as I’m beginning to cut the main binding channels in the guitar body.
There are two parts to this phase of the process:
1 – Add Masking Tape Reminders
I begin this part of the process by adding some masking tape over the elements I must avoid when making the initial binding channel cuts.

It is just there to ensure I don’t “space out” and cut through the end graft or neck framing elements. It also gives me an easy-to-see, clean line to reference to make sure I don’t get too close and make a mistake.
2 – Use The Purfling Trick To Cut The Final Binding Channels
Next, we have to make the cuts over the engraft and other detail elements that will get the framing or side purfling miters.
They will need to be routed at a different depth since they will not have the purfling under those areas.
You could measure this and reset the router, but I find that doing that way is too time-consuming and error-prone.
I use a little trick that makes it super easy to have a tight seam between the main bindings and the side elements, like the engraft or neck framing, and the side bindings.
All you need to do is:
- Find a scrap or extra piece of the purfling material that you used when you made your bindings (or any material that exactly matches the purfling thickness).
- Lay it on the guitar so that the router can ride on it while making the final cuts through the decorative side elements.
- Tape it in place so it won’t move while you make the cut

Raising the router up by the same amount as the purfling thickness creates the perfect cut depth to set the stage for your binding and purfling joints.
And, with this method, you don’t even need to readjust the router.
I love to make my purfling, so I always have stacks glued up to use for this operation. If you want to make your own, you can check out our tutorial on How To Make Your Own Purfing.
Luthier’s EDGE Members can go directly to the complete tutorial here.
Step 2: Make The Perfect Miter Tool
With all that loud router stuff out of the way, we finally get to the fun part. For this, we’ll make a simple little tool to help us get things prepped and just right and create our perfect miters.
Here are the steps to making this simple little tool:
- Make a fresh cup of coffee or tea (optional but recommended 😉
- Next, cut off an extra piece of binding about 1″ or so long.
- Then trim it down with a 1/4″ chisel so that it has a 45-degree angle
- Lastly, trim the other side, creating a 90-degree angle.
Bonus tip: I use the reflection of the purfling lines in my chisel blade to help make sure my angles are correct.


Step 3: Perfect The Binding Channels
Now, it’s time to get the binding channels cleaned up and ready.
We’ll use the 90-degree angle side of the little tool we made for this.
I start by gradually removing material left by the router using a 1″ chisel.
I proceed slowly, using a rocking motion, and shave off just a little wood at a time until I get close to the final dimension.
At this point, I can check with the little tool we made and use it to see my progress as I begin making the last few adjustments.

Step 4: Precut The Miter Joints
Once I like the way the bottom of the binding channel is set and I’m happy with how the test piece fits using the 90-degree angle side, it’s time to start fitting the miter.
I begin creating the 45-degree angle and trim it down a tiny bit at a time.
Remember, guitar making is a subtractive art, so remove material slowly until it’s just right.
Don’t go for the hole-in-one on this part; take it a step at a time.
You can’t put the wood back on once you take it off


I test the joint repeatedly and adjust it until it’s just right. I do this for all areas with this type of design, where the side purfling interacts with these other decorative elements.
Going Deeper: The “Why” & Subtractive Thinking
Understanding the process is good, but it can be even more helpful if you understand a little bit more about why I take those steps and my thinking behind them.
My mental framework or looks something like this:
- I approach guitar-making generally as a subtractive art.
- I try to develop a clear vision of what I want to create or what problem I want to solve.
- I then use all my senses to identify what needs to be removed to reach that final state I envisioned.
In practice, sometimes it’s wood that needs to be removed, and at other times, as in problem-solving, the challenge is removing as many variables as possible to help bring the best solution to light.
In this case, I needed to reduce the number of simultaneous objectives and variables in the binding and side-miter joint process.
So I split the process of preparing the binding channels and the miter joints into multiple phases, each with clear and simple objectives and steps—and each with a simple way to check them for accuracy.
Knowing those steps were completed correctly and nothing was overlooked helps reduce stress and increase clarity.
That, in turn, makes the other tasks and processes much easier, more enjoyable, and more consistent.
My hope is that this will do the same for you, help you enjoy your work a little more, and help you get the best results yet on your next guitar.


Thanks for the great information Tom!
Steve, so glad you found it useful! – Tom