A card scraper (also known as a scraper blade, hand scraper, or cabinet scraper) can be one of the most-used luthier tools in the workshop.
Don’t be fooled by how simple this wood-scraping tool appears; it is actually a very intuitive tool requiring experience to master the subtleties of using it to its fullest potential.
At first glance, it seems like it’s just a piece of metal, but with proper sharpening and technique, the scraper can be a fantastic tool for creating and subtly refining both flat and curved surfaces while avoiding many of the drawbacks of sandpaper and the limitations of hand planes.
It took me a while to get a feel for the sharpening and uses of the different types of card scrapers, but my work jumped to a new level once I did.
I created this guide to help you do the same and get the best results possible from your card scrapers.
(Feel free to use the table of contents below to jump to any section you want or read on for a complete cabinet scraper deep-dive.)

What Is A Card Scraper?
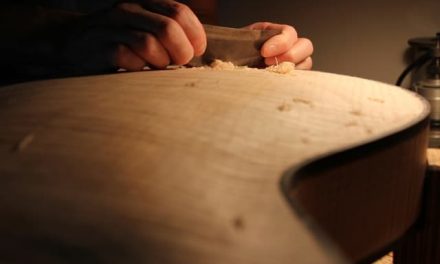
The type of scraper we use for making guitars, cabinet making, and other fine woodworking is typically a single flat piece of steel with a raised burr edge (or hook) and comes in many shapes and thicknesses.
Card scrapers are used to remove wood in a controlled way manually. They are excellent for subtle refinements and removing wood from tricky grain areas without the chipping that could occur with other woodworking tools, such as chisels or hand planes. It is quite an elegant tool.
With proper sharpening, it can produce beautiful results with great speed and unmatched control for creating and refining beautiful contours like those on an archtop guitar or violin.

How Does A Card Scraper Work?
The simplicity with which a card scraper (cabinet scraper) works is almost magical in a way. It starts as a flat piece of steel with a clean square edge.
The most common way to use this for removing wood shavings is to burnish the cutting edge. When we do this, a tiny bit of metal is rolled out into what is known as a “burr” or “hook” along the cutting edge of the scraper using a burnisher tool (we will be discussing the card scraper sharpening process in more detail in a later section).
This burr or hook can create ultra-thin shavings of even the most complex-grained hard and soft woods with ease and with minimal tear-out, chipping, and dust.
Here is the part I find fascinating:
When we draw or roll out the burr edge, this simple tool technically becomes a type of plane rather than an actual true scraper.
This is because that hook is actually cutting through the wood fibers, rather than just scraping.
This cutting action leaves a smooth surface similar to that left by a sharp hand plane.
You can sharpen the scraper to be a true scraper by creating a sharp edge on the steel and NOT using the burnisher to roll out the burr hook.
This can be useful as well, especially if the burr method is creating issues or not cutting as well as you would like in the specific wood you are working on or the application you are using.
An excellent example of an effective burr-less scraper is the StewMac Ultimate Scraper which I love and that we will also be talking about later on in this guide.

I use both types of scraper edges (burr and no burr) for different purposes and with different techniques, as you’ll see in the following sections.
This type of deeper understanding of the tools we use, even the seemingly simple ones like these scrapers, is the key to being able to use each to its strengths and help you achieve better and more precise results with greater efficiency and speed, and in a more conscious and—for me—a more enjoyable way too.
What Are The Types Of Scrapers?
Card scrapers and cabinet scrapers are made in many different shapes, hardnesses, thicknesses, and flexibilities for various applications. When choosing the proper scraper for a specific task, it’s essential to consider these qualities and how they can help you do your work in the best way possible.

Let’s look at them one by one, and I’ll share my personal preferences and how I apply this when choosing the proper scraper for each task when building my guitars.
Scraper Shape and Size
The shape of the card scraper should be matched to the shape and size of the surface you are working to create. This is relatively straightforward, but the one thing that might be a little less obvious is that the shape can be easily manipulated as you work by flexing the scraper.
This is why I prefer a thin scraper for my guitar work—I can start with a curve close to the shapes I am creating but then get an unlimited amount of refinement to that shape as I work by flexing the scraper blade as I go.
It becomes second nature after a while, and I enjoy freedom and flexibility (pun intended) when working with a flexible blade on complex and subtle curves, such as the top and back of an archtop guitar.
Scraper Thickness and Flexibility
In my approach, I think of the scraper’s thickness mainly in terms of how flexible it will be. The steel thickness may affect the burr edge, but I haven’t noticed it much, and since I rarely use the scraper without flexing it a little, I tend to focus on its flexibility.
This might sound a little counterintuitive, but I find that in some cases, the best way to create a truly flat surface (especially on very tricky and complex grain and figured woods) is to use a straight scraper blade but to flex it into a subtly curved blade.
Because of this, even when working on flat areas, I many times use a scraper that I can still flex a little bit to target specific high spots and achieve a perfectly flat surface.
One other thing to mention about card scraper thickness is that a thicker blade can be used in the true scraper fashion described earlier (no burr). If you want to remove lots of wood quickly, a thicker blade like the Ultimate Scraper with a true scraper edge can quickly remove quite a bit of wood. It’s great for tasks like scraping down guitar binding and is a joy to use.
With the above in mind, let’s take a look at the types of card scrapers I have used over the years for my luthier work, as well as the applications I find them to be best suited for.
I’ll share which card scrapers are my favorites, and which ones I just couldn’t get comfortable with, and—most importantly—WHY.
Curved Scrapers
We can start with the gooseneck curve scraper. The idea is that it has an almost unlimited set of curves contained within it, but I never could get comfortable with this one. I think I did use it for a few guitars because it was all I had, but eventually, I bought a new set, since I just never connected with this shape.

This scraper was a little thick for me, though, when working on the subtle curves of an archtop guitar top or back, for example, which definitely played a role in stopping this tool from becoming one of my favorites. Many people use gooseneck scrapers and love it, so as always, keep in mind that this is very much about personal preference and finding the scraper tool that suits you and your style, and that gets you the best results.
I have seen a few other variations over the years, but these are the main styles that I have the most personal experience using in my work.
My Favorite Card Scraper Set
I have no idea what year I bought this set, but I know it was a long time ago (maybe 2000 or something). I liked the idea of having so many different shapes for different things when I bought it, but what I did not know was that the larger blade in this set would become one of my primary tools used every day for over 100 guitars and counting.
I use the other small scrapers in the set, but not as much for scraping wood. I think I mainly use them for cleaning glue squeeze out or scraping the finish off from under the bridge area after I do my French polishing and other related tasks.

I originally bought this set from Luthier’s Mercantile, but unfortunately, it is no longer available. I couldn’t find a suitable replacement online at the time of this writing, but in case you want to find something similar, here are the dimensions of the larger scraper, which I use the most and seems to be the hardest to find: 47mm(widest part of the curve) X 110mm length and .39mm thick (.015″).
There are a few sets over on Amazon that I looked like they might be good, but I haven’t tried them yet. Here is a link in case you want to take a look: Wood Scraper Sets
Even the smaller oval scraper is fantastic for roughing in the recurve on an archtop in tight places like the cutaway area (so I’m hoping we can find a suitable replacement for that one as well, this oval scraper from StewMac looks very promising).
Once that recurve is roughed in, I switch up the larger curved scraper and use the curved edge to refine and sweep the recurve out into the top or back in the most elegant way possible.
I could not do my work as well or as enjoyably without those two simple tools. If all else fails, you could get a rectangular cabinet scraper and grind or file it down to the shape you need. You must be careful not to overheat it, though, and change the steel’s temper.
Lie-Nielsen Scrapers
A few years ago, my lovely wife bought me a wonderful set of Lie-Nielsen scrapers for Christmas. One is a bit thicker than the other. They are both made with the exceptional precision and quality of all the Lie-Nielsen tools, but even though they are so great, I just don’t use them as much as that one blade with the curved edge I mentioned earlier.
I think this is mainly because I am most often working with creating and refining subtle curves in my day-to-day work. All that being said, if you are looking for the ultimate rectangular cabinet scrapers then then these just might be the perfect fit for you.

When I do need a good flat surface, though, the Lie-Nielsen scrapers are absolutely excellent. When properly sharpened, they hold an edge for a long time, creating stunningly beautiful ultra-thin wood shavings and leaving a nearly finish-ready surface. Not surprisingly, I like the thinner of the two I have and use it far more than the thicker one, for reasons I mentioned earlier in the last section.
All that being said, if you are looking for the ultimate rectangular cabinet scrapers then then these just might be the perfect fit for you.
The Stewmac Ultimate Scraper
The Ultimate Scraper from StewMac is a fantastic tool, especially when used to its strengths. I love it for scraping down bindings and for smoothing out flat areas like guitar headstocks quickly. I have the full set of these and they are now a vital part of my process.
Here is how I think of them; Do you know how a hard sanding block helps to get a nice flat even surface quickly and a softer block can help you get smooth contours and curves?
Well this scraper is the “hard sanding block” of my scraper arsenal and it helps to get faster and better results when I need things scraped down quickly and accurately. Because it is so hard (almost as hard as the burnisher itself) it is not sharpened by rolling out a burr like traditional card scrapers but sharpened by using a small grinder.
Because of this, it functions more like true scraper rather than a micro plane, but man, does it remove wood quickly. At about 1/8″ thick, the stiffness allows unmatched precision and even one-handed use when needed.

I was reluctant to try this tool for years because, as you now know by now, the flexing of the scraper to finesse the contours of my guitar tops and backs and other areas is a vital part of my approach as a luthier. But the Ultimate Scraper forced me to rethink the applications a scraper could be used for, and my technique as well.
Actually, it inspired me to research more and more deeply understand the difference between a burr edge scraper (technically a micro plane) and a true scraper edge tool like this.
It just goes to show you that it’s essential to step out of your comfort zone sometimes and try a new tool or technique, that there is always more to learn, and that is the reason this journey into the art of lutherie is a never-ending one always filled with new wonders to discover and enjoy.
Sharpening The Ultimate Scraper – It’s very important to note that this scraper is not sharpened the way traditional card and cabinet scrapers are. For a detailed guide on how to sharpen the StewMac Ultimate Scraper click here.
Tips And Customizing Your Scraper
Don’t be afraid to customize the shape to fit your style and your application.
The first thing I did way back when, after getting what became my favorite scraper, was to accidentally make some deep scratches in a guitar top while using it, almost ruining it from the sharp edges on either side of the curved part of the blade.

So I grabbed the nearest mill file and rounded over those pointy corners.
Once I made that slight alteration to the card scraper, it was my instant favorite and still is!
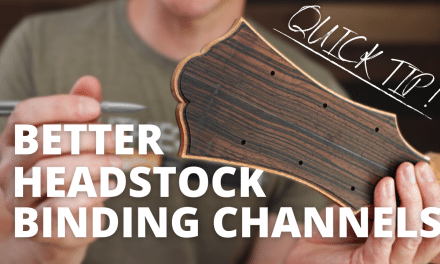
Another tip to customize your scraper is to use some tape to keep it from scraping things you don’t want it to. (See the image below) I like to tape one side of my Ultimate Scraper sometimes when scraping down guitar binding.
This way I can scrape the binding and not scrape the surface of the guitar top, back or sides.
Scraper Sharpening Basics And Tools Needed
One of the things that makes a card or cabinet scraper so great is the ease and speed of sharpening it. I will share with you the scraper sharpening process I use to put a super-fast and sharp burr edge on my scrapers with minimal interruption to my workflow.
The key to a good card or cabinet scraper sharpening is understanding how the scraper works, as we discussed in the previous section. If you didn’t read that part or if you need to check it out again, here’s a link: How A Scraper Works.
I like to keep the mental image of that rolled-out burr edge we want to create in my mind. I also keep in mind the current state of the actual burr edge, which is usually chipped and dull and irregular by this point.

Before we start, there are a few tools you will need for sharpening your scraper:
- A vise of some kind to hold the scraper while you work on it. (See the vise I use here)
- A flat mill file (also known as a bastard file) to clean up and square the edges.
- An oil stone, diamond stone, or fine sandpaper, whatever your preference of those, will work just fine.
- A scraper burnisher tool. A burnisher is simply a round piece of metal harder than the metal the scraper is made from. For general woodworking, a straight-round burnisher is most commonly used, and that type is excellent for regular rectangular cabinet scrapers. I like to use a burnishing tool like this one with the angle already set into it for my guitar-making work. There is another one made by Veritas that works well and is a little safer as well; you can check it out here. It seems to work better on the smaller and odd shapes of scrapers I use. I find that it’s also a little safer. I managed to cut myself pretty bad once when I was pushing too hard, and the burnisher slipped off the edge of the scraper, so it’s a good idea to exercise some caution and don’t push so hard when burnishing (more on this later).
How To Sharpen A Card Scraper
Getting a great edge on your scarper can be done in just a few simple steps.

1 - Square The Edge
First, we have to clean off the old burr and re-establish a nice smooth and clean 90-degree edge.
We do this using a mill file (or bastard file) to clean up the sides and the side edge.
For this, you can use any simple guide to hold that 90-degree angle while you work, or if you are in a hurry, you can just eyeball it like I do many times.
(Veritas makes an excellent jig to hold the file and set the right angles—you can check it out here.)

2 - Polish The Edge
The next step is to remove the file’s scratches with some oil stones, diamond stones, or very fine sandpaper.
I’m listing this part as optional because I often skip this step, and the reason is that I am not trying to get a finish-ready surface when scraping.
If the burr edge has some irregularities from the file teeth that leave some marks, it’s OK, since I’ll be doing several phases of finish sanding when I am done. However, if you are going for an ultra-smooth surface, then this step is important.
Repeat the same steps we did with the file to get the sharp 90-degree angle, only this time with your choice of stones or sandpaper.
I most often use this sandpaper since I don’t need any oil for it. (I don’t like to have oil around the guitars as it could cause finishing issues if it were to get into the wood accidentally.)

3 Draw Out The Burr
When the edge feels smooth and is 90 degrees (or close enough to it), we can then roll out the burr with a burnisher. This is a simple process of holding the burnisher on a consistent angle (usually around 5-15 degrees) and rubbing it along the edges.
I do this in two steps.
First, on the scraper’s flat sides.
Second, I use a very subtle angle, maybe 5 degrees or even less, and draw the burnisher across the surface about 10 times or so.
I pushed very hard for a long time, but later I found that it doesn’t need much pressure to get good results.

4 - Turn The Hook (Roll Out The Burr)
Next, I put the scraper in a vice, and this time using a bit more angle (around 5 -15 degrees or so), I run the burnisher along the edges to draw up the burr (aka turning the hook).
The burnisher tool I use already has the angle built in so I don’t have to think much about it, I just focus on an even amount of pressure.
I do this about 10 times or until I can feel a nice burr hook. As with the last step, you don’t need to press hard, just enough to roll out that burr.
Here’s a simple test to see if you did it right:
If you get wood dust, you need to re-roll that hook (repeat steps 3 and 4).
If you get shavings, you get an A+; nice work!
(One thing to note is that when working with figured woods or end-grain, you will usually get more dust-like shavings, so be sure to do your test on some non-figured face-grain wood.)
And that’s It!
You should now have a razor-sharp and even (micro-plane) burr on your scraper that will produce excellent results even in the most difficult or figured woods.
After years of using and sharpening these tools, I feel that the key is experimenting with how hard you need to press and what angle to use for the smoothest cutting action and wood shavings in the wood you are working.
Final Thoughts
I hope you enjoyed this detailed guide to scrapers and that it helps you get better results on your next woodworking or guitar-making project. If you need more help with handcrafting your guitars, I invite you to look at our online luthier school—The Luthier’s EDGE.


totally inspiring videos ,,thank you so much